Skip to content
DisclaimerTerms Of UseGDPR PolicyCookie Policy

eataroundit

  • Home
  • Drinks
  • Appetizers
  • Dinner
  • Dessert
  • About
  • Contact
  • Privacy Policy
DisclaimerTerms Of UseGDPR PolicyCookie Policy

NO-ING-IMG

- 4 medium russet potatoes, scrubbed and cut into wedges - 3 tablespoons extra virgin olive oil - 4 cloves garlic, finely minced - 1 teaspoon onion powder - 1 teaspoon dried oregano - 1 teaspoon sweet paprika - ½ cup freshly grated Parmesan cheese - Sea salt and freshly cracked black pepper, to taste - Fresh parsley, finely chopped, for garnish You can switch out russet potatoes for Yukon Gold potatoes. They are sweeter and creamy. For a lighter option, use olive oil spray instead of extra virgin olive oil. If you lack fresh garlic, garlic powder works too. Use 1 teaspoon in place of fresh garlic. When choosing potatoes, look for firm ones without any soft spots. Avoid potatoes with green patches, as they can taste bitter. To get the best flavor, choose medium-sized potatoes. They cook evenly and create a fantastic texture. Always scrub the potatoes well before cutting. This removes dirt and keeps the skin nice and crisp. First, set your air fryer to 400°F (200°C). Preheat it for about 5 minutes. This step gets the fryer hot. A hot air fryer helps the potato wedges cook evenly and become crispy. While your air fryer heats, wash and cut 4 medium russet potatoes into wedges. Place the wedges in a big mixing bowl. Add 3 tablespoons of extra virgin olive oil. Toss the wedges to coat them well. Next, add 4 minced garlic cloves, 1 teaspoon of onion powder, 1 teaspoon of dried oregano, and 1 teaspoon of sweet paprika. Sprinkle in sea salt and cracked black pepper for taste. Mix everything well. Finally, gently add ½ cup of freshly grated Parmesan cheese. Toss again to ensure the cheese sticks to every wedge. Carefully place the potato wedges in the air fryer basket. Make sure they are in a single layer. Avoid stacking them to keep them crispy. Air fry for 15 to 20 minutes. Shake the basket halfway through for even cooking. Watch for a golden brown color and softness inside. Once done, take them out and place them on a serving platter. Garnish with finely chopped fresh parsley for a nice touch. Enjoy your crispy garlic Parmesan potato wedges! To get your potato wedges extra crispy, follow these steps: - Cut wedges evenly: Aim for uniform sizes. This helps them cook evenly. - Soak before cooking: Soak the cut wedges in water for at least 30 minutes. This removes some starch and makes them crispier. - Dry thoroughly: After soaking, pat the wedges dry with a towel. Moisture can prevent crispiness. - Don’t overcrowd: Arrange the wedges in a single layer in the air fryer. If they are too close, they will steam instead of crisp. Feel free to mix up the flavors! Here are some fun ideas: - Spicy twist: Add cayenne pepper or chili powder for heat. - Herb blends: Try fresh or dried herbs like thyme, rosemary, or basil for a fresh taste. - Cheesy delight: Mix in cheddar cheese or feta for a different cheese profile. - Zesty flavor: Add lemon zest or a splash of lemon juice to brighten the dish. These wedges are perfect as a snack or side dish. Here are some ideas to enjoy them: - Dipping sauces: Serve with marinara sauce, ranch, or garlic aioli for added flavor. - Topping options: Top them with crumbled bacon and green onions for a loaded snack. - Pairing: Serve alongside grilled chicken, burgers, or a fresh salad for a complete meal. - Garnish: A sprinkle of fresh parsley not only adds color but also freshness to each bite. {{image_4}} If you like heat, add some spice! Mix in cayenne pepper or crushed red pepper flakes. Start with half a teaspoon and adjust to your taste. This kick adds depth to the garlic and cheese. The result is a bold flavor you will love! For a fresh twist, try adding herbs. Mix in fresh rosemary or thyme with the other spices. You can also use dried herbs if fresh are not available. The herbs give the wedges a fragrant aroma. Each bite will taste like a garden party! Want more cheese? Try using a blend of cheeses! Mix Parmesan with cheddar or mozzarella. Go for half a cup of each. The more cheese, the richer the flavor. This variation makes the wedges extra gooey and delicious. Perfect for cheese lovers! After enjoying your Air Fryer Garlic Parmesan Potato Wedges, you may have some left. To store them, let the wedges cool down first. Place them in an airtight container. They can last in the fridge for up to 3 days. Make sure to separate layers with parchment paper to keep them from sticking. To bring back the crispiness when reheating, use the air fryer again. Preheat it to 350°F (175°C). Place the wedges in a single layer and heat for about 5 to 7 minutes. This method keeps them crisp and warm. You can also use the oven. Set it to 375°F (190°C) and bake for 10 minutes. If you want to freeze the wedges, do this right after cooking. Let them cool completely. Then, spread them on a baking sheet in a single layer. Freeze for about 1 hour until firm. After that, transfer them to a freezer bag and remove as much air as possible. They will stay good for about 2 months. When ready to eat, you can air fry them straight from the freezer. Just increase the cooking time by a few minutes. To make your potato wedges crispy, start by preheating your air fryer to 400°F (200°C). This step warms up the air fryer, leading to a perfect crunch. Make sure to coat the wedges evenly in olive oil and spices. This helps them crisp up nicely. While cooking, don’t overcrowd the basket. Give each wedge space for hot air to circulate. Shake the basket halfway through cooking to ensure even browning. Cook them until they are golden brown and tender inside. Yes, you can use different cheeses! Parmesan adds a great flavor, but you can try others. Cheddar gives a sharp taste. Mozzarella melts well and offers a gooey texture. For a spicy kick, pepper jack cheese works great too. Just remember to adjust the amount based on the cheese's flavor strength. You can store the potato wedges in the fridge for up to three days. Place them in an airtight container to keep them fresh. For longer storage, freeze them. They can last for up to three months in the freezer. To reheat, use an air fryer or oven for best results. This keeps them crispy and tasty. We explored the key ingredients for tasty air fryer potato wedges, along with tips for picking the best potatoes. You learned to preheat your air fryer and prepare your wedges for perfect crispiness. We discussed fun seasoning options and yummy variations you can try. Proper storage and reheating methods keep your leftovers fresh. In summary, these tips ensure your potato wedges are always a hit. Enjoy experimenting in your kitchen!

Air Fryer Garlic Parmesan Potato Wedges Crisp Delight

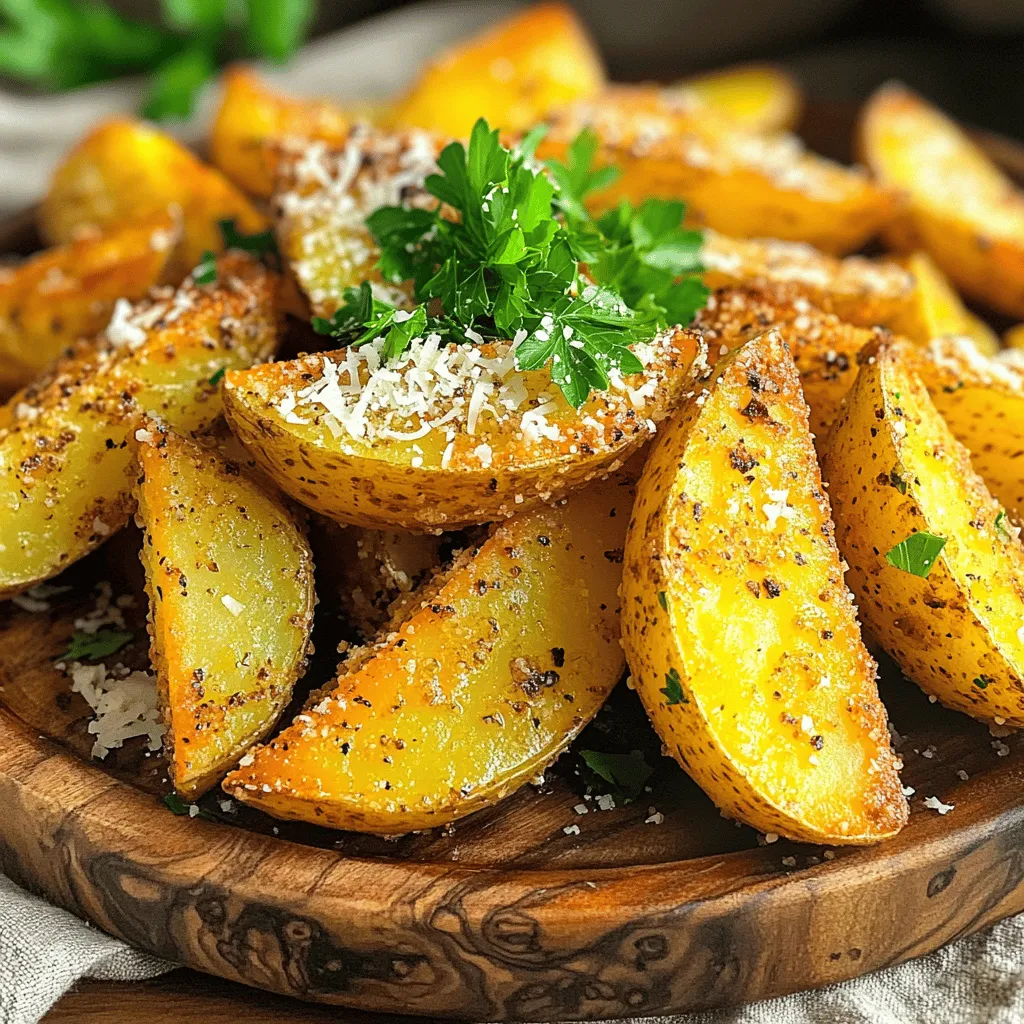
Welcome to my kitchen, where deliciousness awaits! Today, I’m sharing my easy recipe for Air Fryer Garlic Parmesan Potato Wedges.

- 2 cups cooked brown rice - 2 cups fresh broccoli florets - 1 cup shredded sharp cheddar cheese (plus an additional 1/4 cup for topping) - 1 cup cream of mushroom soup (store-bought or homemade) - 1 cup whole milk - 1/2 cup finely diced onion - 2 cloves garlic, minced - 1 teaspoon garlic powder - 1 teaspoon onion powder - Salt and freshly ground black pepper, to taste - 1/2 cup panko breadcrumbs - 2 tablespoons extra virgin olive oil (plus more for greasing) - Fresh parsley, finely chopped (for garnish) You can add some fun flavors to your casserole. Consider adding: - Cooked bacon or ham for a meaty touch. - Sliced mushrooms for a deeper taste. - Red bell pepper for a pop of color and sweetness. - Hot sauce if you like a bit of spice. If you have dietary needs, worry not! Here are some swaps: - Use quinoa or cauliflower rice instead of brown rice for a lighter feel. - Swap cream of mushroom soup with a dairy-free version for a vegan option. - Choose almond milk or oat milk in place of whole milk to cut dairy. - For a gluten-free dish, use gluten-free breadcrumbs instead of panko. These options let you customize your casserole to fit your taste and diet while keeping it tasty! First, preheat your oven to 350°F (175°C). Take a 9x13 inch casserole dish and grease it lightly with olive oil. This step helps the casserole not stick. In a large saucepan, warm 2 tablespoons of olive oil over medium heat. Add 1/2 cup of finely diced onion and 2 cloves of minced garlic. Sauté for 3-4 minutes until the onion is soft and clear. Then, toss in 2 cups of fresh broccoli florets. Keep cooking for another 2-3 minutes. The broccoli should be tender but still bright green. Once done, take the pan off the heat. In a big mixing bowl, combine 2 cups of cooked brown rice, the onion and broccoli mix, 1 cup of cream of mushroom soup, and 1 cup of whole milk. Add 1 teaspoon each of garlic powder and onion powder. Season with salt and pepper. Mix everything well until it’s smooth. Next, fold in 3/4 cup of shredded sharp cheddar cheese. Make sure it’s evenly mixed in. Now, transfer the rice and veggie mixture into the greased casserole dish. Spread it evenly with a spatula. Sprinkle the remaining 1/4 cup of shredded cheddar cheese on top. For a crispy finish, mix 1/2 cup of panko breadcrumbs with a little olive oil in a small bowl. Sprinkle this over the cheese layer. Bake the casserole uncovered for 25-30 minutes. Look for a golden brown top and bubbling cheese. After baking, let it cool for 5 minutes before serving. For a fresh touch, add some chopped parsley on top. To get the best rice for your casserole, use brown rice. It has great flavor and texture. Cook it just right before you mix it in. Follow these steps for perfect rice: - Rinse the rice in cold water until the water runs clear. - Use a 2:1 water-to-rice ratio. - Bring water to a boil, add rice, and cover. - Reduce heat and simmer for 45 minutes. - Remove from heat and let it sit covered for 10 minutes. This method keeps your rice fluffy and not mushy. Melted cheese makes your casserole creamy. For the best melt, use sharp cheddar. Here’s how to get it just right: - Grate the cheese yourself; pre-shredded cheese has additives. - Mix the cheese into the warm rice and veggie mix. - Save a bit of cheese for the top. - Bake until bubbly and golden to get that perfect melt. This will make every bite cheesy and delicious. A crispy topping adds a great crunch. Here’s how to achieve that: - Use panko breadcrumbs instead of regular breadcrumbs. - Mix breadcrumbs with a splash of olive oil for extra crunch. - Sprinkle the mixture evenly over the cheese layer. - Bake uncovered to allow the heat to crisp it up. This will give your casserole a tasty finish that everyone will love. {{image_4}} If you want a vegetarian twist, you can keep this dish simple. Just skip any meat and focus on the veggies. You can add more green veggies like peas or spinach for extra color and taste. You can also use different cheeses. Consider using mozzarella for a milder flavor or a spicy pepper jack for a kick. These changes make the casserole still delicious and filling. To make this meal heartier, you can add chicken or turkey. Cooked, shredded chicken works best. Stir in about 1 to 2 cups of chicken after mixing the rice and veggies. For turkey, use the same amount. This adds protein and keeps the dish tasty. You can even season the meat with spices to match your taste. For a gluten-free version, swap the panko breadcrumbs with crushed gluten-free crackers. You can also use brown rice that is labeled gluten-free. Make sure the cream of mushroom soup is gluten-free too. These small changes ensure everyone can enjoy this dish. You still get that creamy, cheesy goodness without the gluten. To store leftover casserole, let it cool first. Then, place it in an airtight container. You can keep it in the fridge for up to four days. Make sure to cover it well to keep it fresh. If you want to enjoy it later, consider freezing it. When you reheat the casserole, use the oven for the best results. Preheat your oven to 350°F (175°C). Place the casserole in an oven-safe dish. Cover it with foil to keep it moist. Heat for about 20-25 minutes. You can also use the microwave, but it may not be as crispy. To freeze the casserole, first let it cool completely. Cut it into portions for easy use later. Wrap each piece tightly in plastic wrap, then place them in a freezer bag. Label the bags with the date. You can freeze it for up to three months. When ready to eat, thaw it in the fridge overnight before reheating. Yes, you can make this casserole ahead of time. Prepare the dish up to the baking step. Cover it tightly with foil and place it in the fridge. When ready to bake, just pop it in the oven. You may need to add a few extra minutes to the baking time. This makes meal prep easier and saves time on busy days. You can serve many sides with Cheesy Broccoli Rice Casserole. Here are a few ideas: - Grilled chicken or fish - A fresh green salad - Steamed vegetables - Garlic bread These options balance the rich, creamy casserole and make a complete meal. Yes, you can create a dairy-free version of this casserole. Use dairy-free cheese and a plant-based milk, like almond or oat milk. For the cream of mushroom soup, try a dairy-free version or make your own with coconut milk. This way, you can enjoy the same flavors without dairy. You can store leftovers in the fridge for about 3 to 4 days. Make sure to cover the casserole tightly to keep it fresh. If you want to keep it longer, consider freezing it. Just wrap it well and store it in the freezer for up to 3 months. When ready to eat, thaw it overnight in the fridge and reheat it in the oven. This blog post covers everything you need to make a great Cheesy Broccoli Rice Casserole. We looked at key ingredients, step-by-step instructions, and important tips for cooking it just right. You learned about adding flavors and making this dish to fit your needs. Remember, there are so many ways to enjoy this recipe! You can adjust it for different diets or serve it with tasty sides. With these guidelines, you can create a delicious meal that everyone will love. Enjoy your cooking!

Cheesy Broccoli Rice Casserole Simple and Tasty Dish

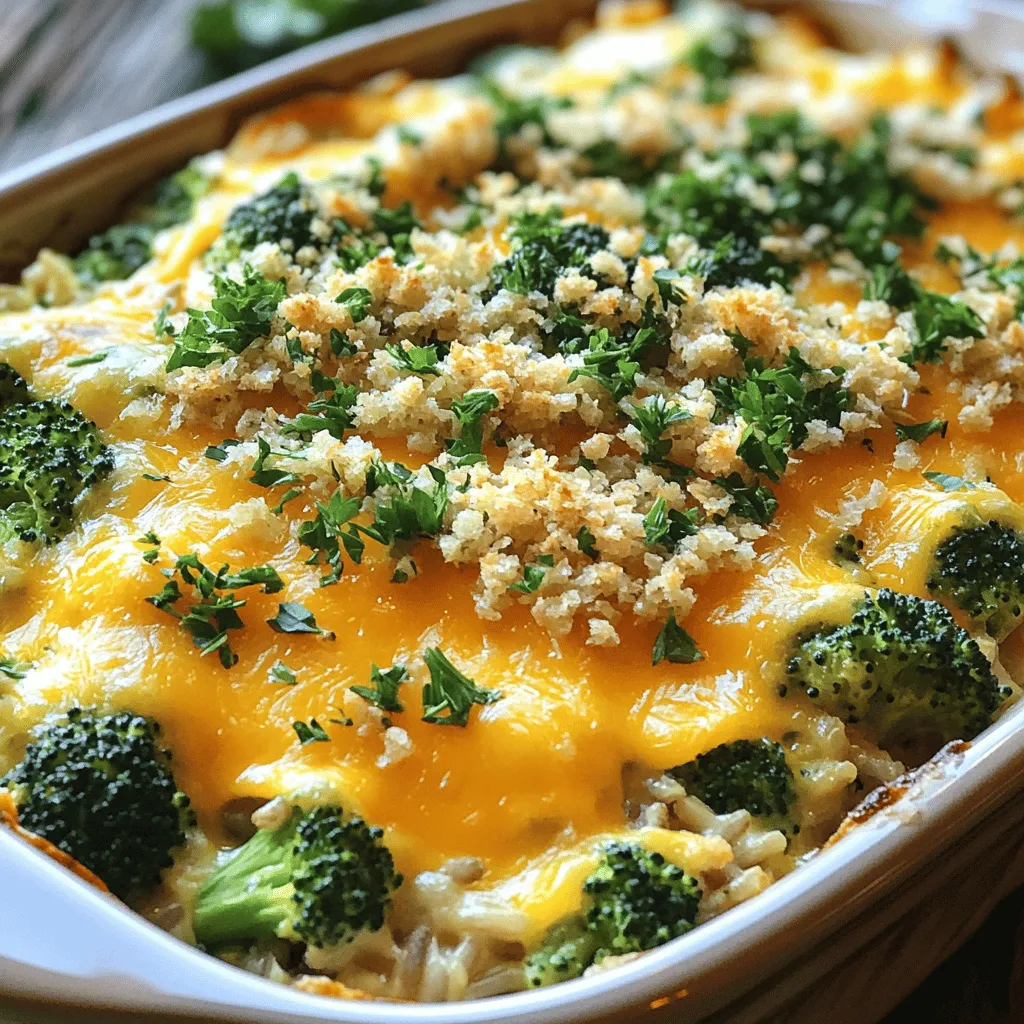
Looking for a quick and tasty meal? My Cheesy Broccoli Rice Casserole is perfect! This dish combines creamy cheese and

To make this Zesty Lime Cilantro Quinoa Salad, you will need the following fresh and vibrant ingredients: - 1 cup quinoa, thoroughly rinsed - 2 cups water or vegetable broth - 1 cup cherry tomatoes, halved - 1 bell pepper, diced - 1/2 cucumber, diced - 1/4 red onion, finely chopped - 1 cup corn (fresh or canned, drained) - 1/2 cup fresh cilantro, roughly chopped - Juice of 2 limes - 3 tablespoons olive oil - 1 teaspoon ground cumin - Salt and black pepper to taste These ingredients work together to create a salad that is not only colorful but also packed with flavor. Quinoa serves as a great base. It is high in protein and gluten-free. The lime juice adds a bright zing, while the cilantro gives a fresh, herbal note. Each veggie adds its own crunch and sweetness, making every bite exciting. 1. Start by boiling 2 cups of water or vegetable broth in a medium pot. 2. Once it boils, add 1 cup of rinsed quinoa with a pinch of salt. 3. Cover the pot with a lid and reduce the heat to low. Let it simmer for about 15 minutes. 4. After 15 minutes, remove it from heat but keep it covered for another 5 minutes. 5. Finally, use a fork to fluff the quinoa and set it aside to cool. 1. While the quinoa cooks, chop your veggies. 2. In a large bowl, mix together: - 1 cup of halved cherry tomatoes - 1 diced bell pepper (red or yellow) - 1/2 diced cucumber - 1/4 finely chopped red onion - 1 cup of corn (fresh or canned, drained). 1. Once the quinoa cools, gently fold it into the veggie mix. 2. For the dressing, whisk together: - Juice of 2 limes - 3 tablespoons of olive oil - 1 teaspoon of ground cumin - A pinch of salt and black pepper. 1. Drizzle the dressing over the quinoa and veggies. 2. Add 1/2 cup of chopped fresh cilantro. 3. Use a spatula or spoon to gently mix everything until well combined. 1. Cover the salad with plastic wrap or put it in an airtight container. 2. Chill it in the fridge for at least 30 minutes. This lets the flavors come together nicely. Rinsing quinoa is key. It removes the bitter coating called saponin. Use a fine-mesh sieve and rinse under cold water for a few minutes. This step ensures a pleasant taste in your salad. Cooking time adjustments may be needed based on your stove. Generally, quinoa cooks in about 15 minutes. If your quinoa is still crunchy, add a bit more water and simmer longer. Adjusting lime juice and seasoning can elevate your salad. Start with the juice of two limes, then taste. If it needs more zing, add extra lime juice. Use fresh ingredients for the best flavor. Fresh cilantro, ripe tomatoes, and crunchy peppers all make a difference. Always choose the freshest produce you can find to maximize taste. Serving suggestions can make your salad pop. Chill the salad and serve it in a vibrant bowl. This makes the colors stand out. Garnishing tips include adding extra cilantro leaves and lime wedges. These touches not only look good but also add extra flavor. A colorful platter can impress your guests, making the meal feel special. {{image_4}} You can make this salad heartier by adding protein. Grilled chicken or shrimp works well. Just slice or dice it and mix it in. If you prefer plant-based options, black beans or chickpeas are great choices. They add protein and fiber, making the salad even more filling. This salad is easy to adapt for different diets. You can keep it vegan by using vegetable broth. If you want to make it gluten-free, just ensure the quinoa is certified gluten-free. These simple swaps keep everyone happy at the table. To change up the taste, try other fresh herbs. Basil or parsley can add a new twist. You can also experiment with different dressings. A balsamic vinaigrette or a creamy avocado dressing can give it a unique flavor. Mixing things up keeps the salad exciting and fresh every time! To store your Zesty Lime Cilantro Quinoa Salad, place it in an airtight container. This keeps it fresh and prevents smells from mixing. The salad stays good for about three to five days in the fridge. Always check for freshness before eating. You can freeze this salad, but the texture may change. If you choose to freeze it, use a freezer-safe container. When it's time to eat, thaw it overnight in the fridge. Avoid using a microwave as it can make the salad soggy. To refresh the salad after storage, add a bit of lime juice and olive oil. This brings back the zesty flavor. Serve it cold or at room temperature. It tastes great on its own or as a side for grilled meats. Enjoy every colorful bite! You can store this salad in the fridge for up to three days. Keep it in an airtight container to keep it fresh. The flavors will blend nicely as it sits, but the veggies may get a bit softer over time. Yes, you can make this salad ahead of time! Prepare it up to a day before. Just mix all the ingredients and store them in the fridge. When you are ready to serve, give it a gentle toss. This salad tastes even better after sitting for a while. You can customize this salad easily. For a protein boost, add grilled chicken or black beans. If you want it vegan, skip the chicken and use chickpeas. For gluten-free needs, this recipe is already safe. You can also swap cilantro for parsley if you prefer a different taste. This blog post covered a fresh and tasty quinoa salad. You learned about the ingredients, preparation steps, and tips to enhance flavor. I shared ways to store your salad and suggested variations to suit different diets. Try this recipe for a healthy meal or side dish. You can easily adapt it with your favorite ingredients. Enjoy creating your own versions and making this dish a part of your meals!

Zesty Lime Cilantro Quinoa Salad Refreshing Delight

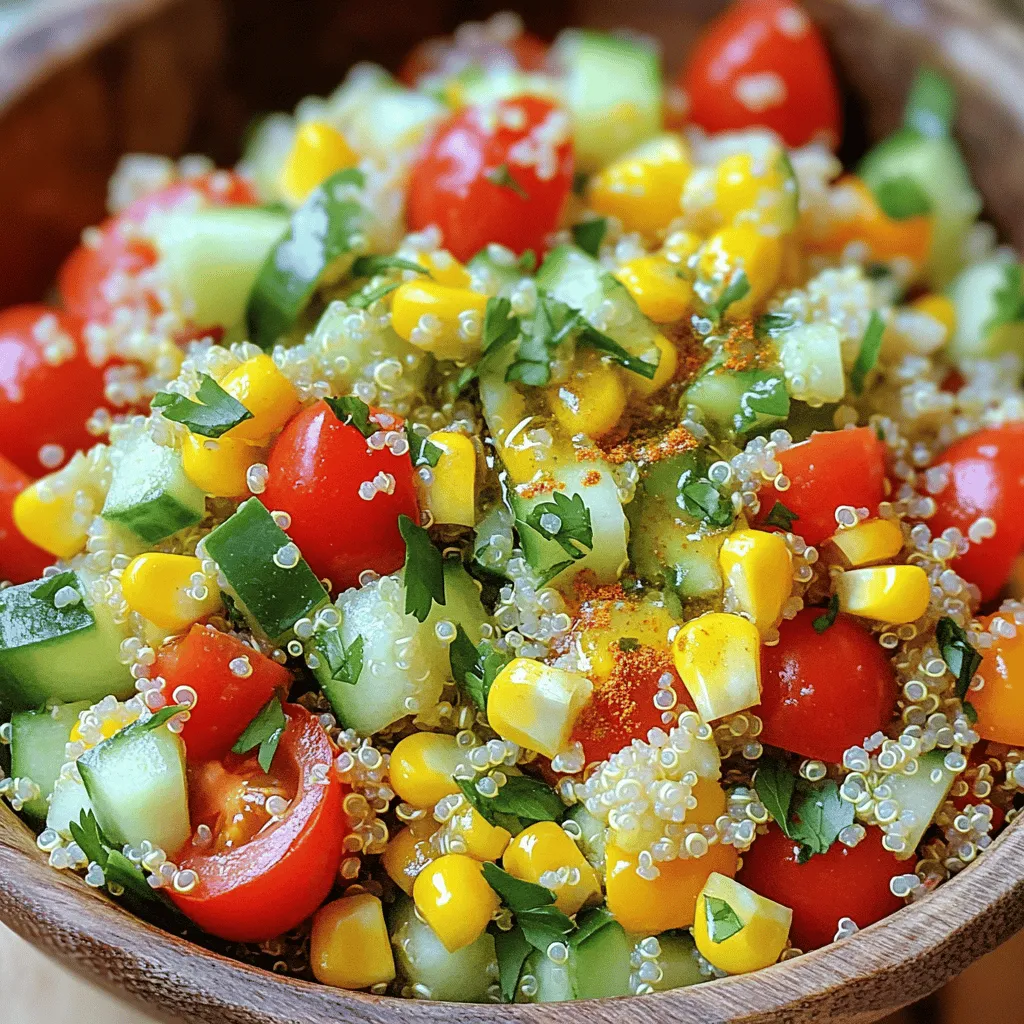
Are you ready to elevate your salad game? This Zesty Lime Cilantro Quinoa Salad is fresh, colorful, and packed with

- 4 mini bagels - 1 cup creamy Greek yogurt - 2 tablespoons pure honey - 1 teaspoon pure vanilla extract - 1/4 teaspoon ground cinnamon - Assorted fresh fruits (sliced strawberries, blueberries, banana wheels) - Chopped nuts (walnuts, almonds) - Optional toppings (chia seeds, shredded coconut, crunchy granola) Each serving has about 150 calories. - Protein: 8 grams - Fats: 3 grams - Carbohydrates: 25 grams Greek yogurt offers many health perks. It is high in protein and low in fat. It helps with digestion and supports muscle health. Plus, it keeps you full longer. The fruits add vitamins, and nuts add healthy fats. Enjoying these bagel bites is tasty and smart for your body! - Preheat the oven to 350°F (175°C). - Arrange split bagel halves on a baking sheet. First, I set my oven to 350°F (175°C). This helps the bagels bake evenly. Next, I take my mini bagels and split them in half. I lay them cut-side up on a baking sheet. I like to use parchment paper to stop them from sticking. - Combine Greek yogurt, honey, vanilla, and cinnamon. - Whisk until smooth. In a medium bowl, I mix together the Greek yogurt, honey, vanilla, and ground cinnamon. I use a whisk to blend everything. It should be smooth and creamy. This mixture is the star of our bagel bites. - Spread yogurt mixture on bagel halves. - Add fruits and nuts as toppings. - Bake for 10-12 minutes. Now comes the fun part! I take the yogurt mix and spread it on each bagel half. I like a thick layer for a rich taste. Then, I choose my favorite fruits, like sliced strawberries and blueberries, to add on top. I also sprinkle chopped nuts for crunch. Finally, I slide the baking sheet into the oven. I bake them for 10-12 minutes until the edges are crisp. After that, I let them cool for a minute. Enjoying these bagel bites is a treat! To get the best yogurt mix, use creamy Greek yogurt. You want it thick but smooth. If it feels too thick, add a tiny bit of milk to thin it out. For sweetness, add more honey if you like it sweeter. You can also try maple syrup or agave as alternatives. To make your bagels crispy, bake them on a parchment-lined tray. It helps avoid sticking and makes clean-up easy. Set your oven to 350°F (175°C) and preheat it well. Bake for about 10-12 minutes until the edges are golden. For a fun look, arrange the bagel bites on a bright platter. Drizzles of honey add shine. You can also sprinkle some fresh mint leaves on top for a lovely touch. Pair these bites with a refreshing drink like herbal tea or sparkling water for a great snack experience. {{image_4}} You can change the flavor of your Greek yogurt bagel bites easily. Try different yogurt flavors like vanilla, strawberry, or even lemon. Each yogurt gives a new taste. If you want a sweeter touch, use maple syrup or agave instead of honey. For seasonal fun, use fruits that match the time of year. Think fresh peaches in summer or warm apples in fall. Mixing flavors keeps these bites exciting! If you need a gluten-free option, look for gluten-free mini bagels. Many brands offer tasty choices. For a vegan twist, use coconut yogurt or almond yogurt. You can swap honey with agave or maple syrup to keep it plant-based. These swaps help everyone enjoy this snack without missing out. Scaling the recipe is simple. Just double or triple the ingredients for a bigger group. You can create mini versions too. Use smaller bagels or cut regular ones into quarters. Mini bagel bites make great appetizers for parties. They’re easy to grab and eat, making them perfect for sharing. To store leftover Greek yogurt bagel bites, place them in an airtight container. This keeps them fresh and tasty. Make sure to seal it tightly. You can store them in the fridge for up to three days. After that, the bagels may become soggy or lose their flavor. Enjoy them warm for the best taste! If you want to save some bagel bites for later, you can freeze them. First, let the bagel bites cool completely. Then, wrap each bite in plastic wrap. Place them in a freezer-safe bag or container. They will keep well for about one month. When you're ready to eat, take them out and thaw them in the fridge overnight. To reheat, place them in the oven at 350°F (175°C) for about 10 minutes. This warms them up nicely. Storing Greek yogurt correctly is key to keeping it fresh. Always keep it in the fridge. Make sure the lid is tightly closed. It should last about one to three weeks. For fresh fruits, store them in the fridge too. Keep berries in their original containers. Bananas and other fruits do best at room temperature. As for nuts, keep them in a cool, dry place. An airtight container helps keep them crunchy. - Preheat your oven to 350°F (175°C). - Split 4 mini bagels in half and place them cut-side up on a baking sheet. - In a bowl, mix 1 cup of Greek yogurt, 2 tablespoons of honey, 1 teaspoon of vanilla, and 1/4 teaspoon of cinnamon until smooth. - Spread the yogurt mix on each bagel half. - Top with fresh fruits and chopped nuts. - Bake for 10-12 minutes until warm and crisp. Making these bagel bites is quick and fun! You can pick your favorite fruits and nuts. This makes each bite a little different and very tasty. Yes, you can use regular yogurt, but the texture will change. Greek yogurt is thicker and creamier. It adds a rich taste. Regular yogurt is thinner and may not stay on the bagels as well. If you use regular yogurt, try straining it to make it thicker. You can also add a bit more honey for sweetness since regular yogurt is less rich. Greek yogurt bagel bites last about 3 days in the fridge. Store them in an airtight container. This keeps them fresh longer. If you want them to stay crisp, eat them soon after baking. The bagels may get soft after a day or two. If you plan to make them ahead, store the toppings separately. This keeps everything fresh and tasty! These Greek yogurt bagel bites are simple, tasty, and healthy. We covered the key ingredients, step-by-step instructions, and storage tips. You can choose your favorite fruits and nuts to customize your snack. Experiment with different flavors and dietary options to make it your own. Snacks like these keep you satisfied and energized. Enjoy making and sharing these delightful bites!

Greek Yogurt Bagel Bites Healthy and Tasty Snack

Are you looking for a quick, healthy snack that’s both tasty and satisfying? Greek Yogurt Bagel Bites might be just

To make this chocolate peanut butter banana bread, you will need the following ingredients: - 3 ripe bananas, well-mashed - 1/2 cup creamy peanut butter (natural for a healthier option) - 1/3 cup melted coconut oil (allow to cool slightly) - 1/2 cup packed brown sugar - 2 large eggs, at room temperature - 1 teaspoon pure vanilla extract - 1 teaspoon baking soda - 1/4 teaspoon fine sea salt - 1 cup all-purpose flour, spooned and leveled - 1/2 cup unsweetened cocoa powder - 1/2 cup chocolate chips (dark or semi-sweet for richness) - Optional: 1/4 cup chopped walnuts or pecans for crunch You can easily swap some ingredients for different flavors or diets: - Use almond butter instead of peanut butter for a nut-free version. - Replace coconut oil with vegetable oil if you prefer. - For gluten-free bread, use almond flour or a gluten-free flour blend. - You can substitute maple syrup for brown sugar for a unique taste. Accurate measuring is key to great banana bread. Here are some tips: - When measuring flour, spoon it into the cup and level with a knife. Do not pack it tightly. - For brown sugar, pack it firmly into the measuring cup for the right amount. - Use a kitchen scale for precise measurements, especially for flour and sugar. - Always check that your bananas are fully ripe; they should have brown spots for the best flavor. Start by preheating your oven to 350°F (175°C). This step is key for even baking. While the oven heats, grab a 9x5 inch loaf pan. Lightly grease the pan or line it with parchment paper. This makes it easy to remove the bread later. In a large bowl, add the well-mashed bananas. Next, scoop in the creamy peanut butter. Mix these two ingredients until the blend is smooth and creamy. Now, pour in the melted coconut oil. Stir well to combine, making sure there are no lumps left. Then, add the packed brown sugar. Mix until everything is well combined. Crack in the two large eggs, adding them one at a time. Make sure to mix well after each egg. Finally, stir in the pure vanilla extract. The mixture should look light and fluffy at this point. In a separate bowl, sift together the baking soda, fine sea salt, all-purpose flour, and cocoa powder. Sifting helps remove lumps and ensures even mixing. Gradually fold this dry mix into the wet mixture. Be gentle; overmixing can make the bread dense. Stir just until combined, then carefully fold in the chocolate chips. If you like, add chopped nuts for extra texture. Now, your batter is ready to go! To keep your banana bread light, avoid overmixing the batter. When you add the dry mix to the wet mix, stir gently. It’s okay if there are a few lumps. If you mix too much, the bread can turn out heavy. Another tip is to use ripe bananas. Ripe bananas have more moisture and sweetness. The more speckles, the better! To check if your banana bread is done, use a toothpick. Insert it into the center of the bread. If it comes out clean or with a few moist crumbs, it’s ready. If the toothpick has wet batter, bake it a bit longer. Keep an eye on the time, but also trust your senses. The bread should smell amazing and look golden brown. Banana bread tastes great warm or at room temperature. For a nice touch, slice it and add a dusting of powdered sugar on top. You can drizzle extra melted peanut butter over the slices for a treat. Fresh banana slices on the side make it even better. This bread is perfect for breakfast or as a snack. Enjoy each bite! {{image_4}} You can make your chocolate peanut butter banana bread even better by adding nuts. Chopped walnuts or pecans add a nice crunch. Use about 1/4 cup of nuts for a balanced texture. You can also try adding shredded coconut for extra flavor. If you love a fruity twist, mix in some dried fruit like cranberries or cherries. They add sweetness and chewiness to every bite. If you want a different flavor or texture, try using alternate flours. Whole wheat flour adds a nutty taste. Almond flour makes it gluten-free and rich. You can mix these with all-purpose flour for a lighter result. For sweeteners, consider using maple syrup or honey instead of brown sugar. They add a unique taste and can make the bread moister. To make this bread vegan, swap the eggs for flax eggs. Mix 1 tablespoon of ground flaxseed with 2.5 tablespoons of water. Let it sit for a few minutes until it thickens. For gluten-free options, use a gluten-free all-purpose flour blend. This keeps the texture light while catering to dietary needs. Experiment with these variations to create your perfect chocolate peanut butter banana bread. To keep your banana bread fresh, wrap it tightly in plastic wrap. You can also place it in an airtight container. Store it at room temperature for up to three days. If you prefer, you can refrigerate it for up to a week. Just be aware that refrigeration can make the bread a bit denser. If you have extra banana bread, freezing is a great option! Slice the bread into individual pieces. Wrap each slice in plastic wrap, then place them in a freezer bag. Make sure to remove as much air as possible. This helps prevent freezer burn. The banana bread can last up to three months in the freezer. When you’re ready to enjoy it, simply thaw it at room temperature or warm it in the oven. The shelf life of banana bread varies. At room temperature, it lasts about three days. In the fridge, it can last a week. When reheating, you can use the oven or microwave. For the oven, preheat to 350°F (175°C) and heat for about 10 minutes. In the microwave, heat for 15-20 seconds. Enjoy your warm, tasty treat! Yes, you can use less sugar. You might try using 1/3 cup instead of 1/2 cup. This change will still keep your banana bread sweet. You can also add extra ripe bananas. They add natural sweetness. Just remember, less sugar may change the texture a bit. If you want to change the peanut butter, try almond butter or sunflower seed butter. Both options work well and add a new taste. Ensure the substitutes are creamy for the best texture. Each option gives a unique flavor, so feel free to experiment! To make this banana bread healthier, use natural peanut butter and coconut oil. You can also reduce sugar, as mentioned before. Adding whole wheat flour boosts fiber content. You might even swap in applesauce for some of the oil. These changes can create a lighter, healthier treat. This blog post covered all you need for great banana bread. We listed key ingredients and smart substitutions. You learned step-by-step instructions that make baking easy. I shared tips to avoid dense bread and how to check for doneness. We explored tasty variations and how to store leftovers. Now, you're ready to bake delicious banana bread. Remember, practice makes perfect. Enjoy your baking journey!

Chocolate Peanut Butter Banana Bread Irresistible Treat

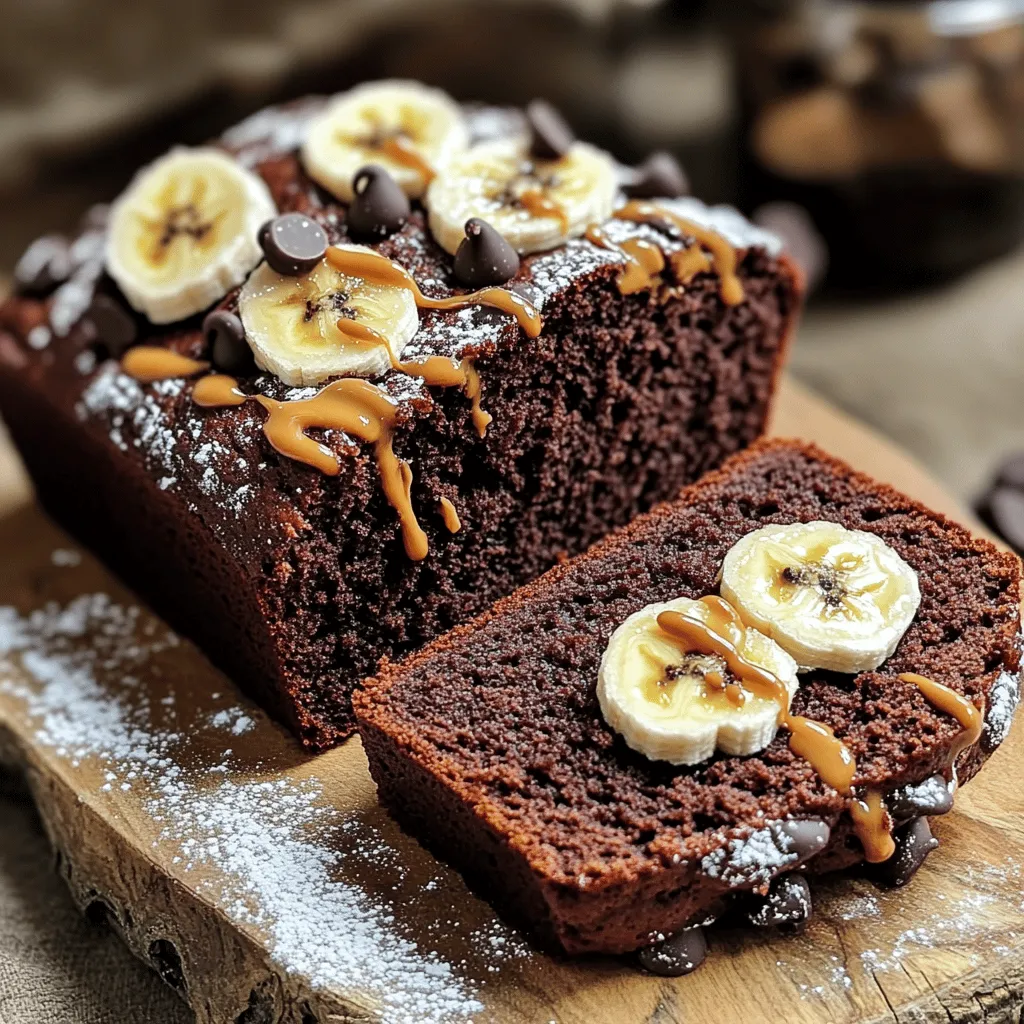
Are you ready for a treat that combines rich chocolate, creamy peanut butter, and ripe bananas? Welcome to my Chocolate

- 6 medium-sized carrots, peeled and cut into thin strips - 2 tablespoons extra-virgin olive oil - 3 tablespoons pure maple syrup - 1 teaspoon garlic powder - 1 teaspoon smoked paprika - Salt and freshly ground pepper to taste - Fresh parsley, finely chopped (for garnish) To make maple glazed carrot fries, you need simple, fresh ingredients. Start with six medium-sized carrots. Peel them, then cut them into thin strips. Thinly sliced carrots cook more evenly and turn crispy. Next, grab two tablespoons of extra-virgin olive oil. This oil adds a rich taste and helps the fries crisp up in the oven. You will also need three tablespoons of pure maple syrup. This sweet syrup gives the fries a delicious glaze and a hint of natural sweetness. For flavor, add one teaspoon of garlic powder. It brings a savory depth to the dish. Then, include one teaspoon of smoked paprika for a warm, smoky flavor. Finally, season with salt and freshly ground pepper to taste. These simple spices will enhance all the flavors. Don’t forget fresh parsley! Finely chop it for garnish. It adds a nice color and fresh note to your dish. With these ingredients ready, you can move on to the next steps to make this tasty snack. First, set your oven to 425°F (220°C). This high heat helps the fries get crispy. Line a baking sheet with parchment paper. This step prevents sticking and makes cleanup easy. Next, grab six medium-sized carrots. Peel them and cut them into thin strips. In a large bowl, add the carrot strips. Pour in 2 tablespoons of extra-virgin olive oil and 3 tablespoons of pure maple syrup. Then, sprinkle in 1 teaspoon of garlic powder and 1 teaspoon of smoked paprika. Add salt and freshly ground pepper to taste. Use your hands or a spatula to toss the carrots well. Make sure every strip gets coated with the oil and seasonings. Now, transfer the carrot fries to the lined baking sheet. Spread them out in a single layer. Avoid overcrowding; this helps them bake evenly. Place the baking sheet in the oven. Bake for 20-25 minutes. Halfway through, flip the fries with a spatula. This step helps them brown nicely. You want them golden brown and crispy, especially at the edges. After baking, let them cool for a few minutes. Finally, enjoy your sweet and savory carrot fries! To get your carrot fries nice and crispy, do not overcrowd the baking sheet. If the fries touch each other, they will steam instead of bake. Lay them out in a single layer. This helps them get that beautiful golden color and crunch you want. Want to spice things up? You can add a pinch of cayenne pepper for heat. A bit of cinnamon can bring a warm flavor. Try adding fresh herbs like thyme or rosemary for an earthy taste. These small changes can make a big difference. For a fun touch, serve the carrot fries in a rustic basket. Line the basket with parchment paper for an appealing look. You can also place them on a colorful plate. Add a yogurt dip or a spicy sauce on the side for extra flavor. This makes the dish not just tasty but also pretty! {{image_4}} You can add a kick to your carrot fries by using cayenne pepper or chili powder. Start with a pinch and adjust to your taste. This spice makes the sweet maple syrup pop. The heat balances the sweetness. You get a snack that is both sweet and spicy. Fresh herbs can add great flavor to your carrot fries. Try using rosemary, thyme, or oregano. Chop them finely and mix them into the carrot mixture. Herbs will brighten the dish and add depth. You can even mix different herbs for a unique taste. Maple syrup is great, but you can try other sweeteners too. Honey, agave nectar, or brown sugar can work well. Each one gives a different flavor twist. Experiment with what you have on hand. You might discover a new favorite! To keep your leftover carrot fries fresh, place them in an airtight container. Make sure they cool down first. Store them in the fridge for up to three days. Avoid leaving them at room temperature to keep them safe to eat. To reheat your carrot fries and keep them crispy, use the oven. Preheat it to 350°F (175°C). Spread the fries out on a baking sheet. Bake for about 10 minutes. You can also use an air fryer for about 5 minutes. This keeps them crunchy and tasty. If you want to store carrot fries for longer, freezing is a great option. First, let them cool completely. Place them in a freezer-safe bag or container. Make sure to remove as much air as possible. They can last up to three months in the freezer. When ready to eat, thaw them overnight in the fridge and follow the reheating instructions to enjoy. You can serve these fries with many tasty dips. Here are some ideas: - Yogurt Dip: Mix plain yogurt with a little lemon juice and herbs. - Hummus: A creamy hummus adds a nice, savory touch. - Ranch Dressing: This classic dip is always a crowd-pleaser. - Salsa: A fresh salsa can add a zesty kick. These pairings make the fries even more fun to eat! Yes, you can use baby carrots! Just cut them into thinner sticks. Keep in mind, they may cook faster. Check them a bit early to avoid overcooking. If you want more flavor, try roasting them longer with the same glaze. Leftover carrot fries can last in the fridge for about 3 to 4 days. Make sure to store them in an airtight container. To reheat, pop them in the oven for a few minutes to regain their crispiness. Avoid microwaving, as this may make them soggy. Enjoy your tasty snack again! In this post, we explored making delicious maple glazed carrot fries. You learned about key ingredients, easy steps, and handy tips to get that perfect crisp. We also discussed fun variations, storage methods, and answered common questions. Remember, these fries are not just tasty, but simple to prepare. Enjoying healthy snacks can be easy and fun. Try these ideas and make them your own!

Maple Glazed Carrot Fries Simple and Tasty Snack

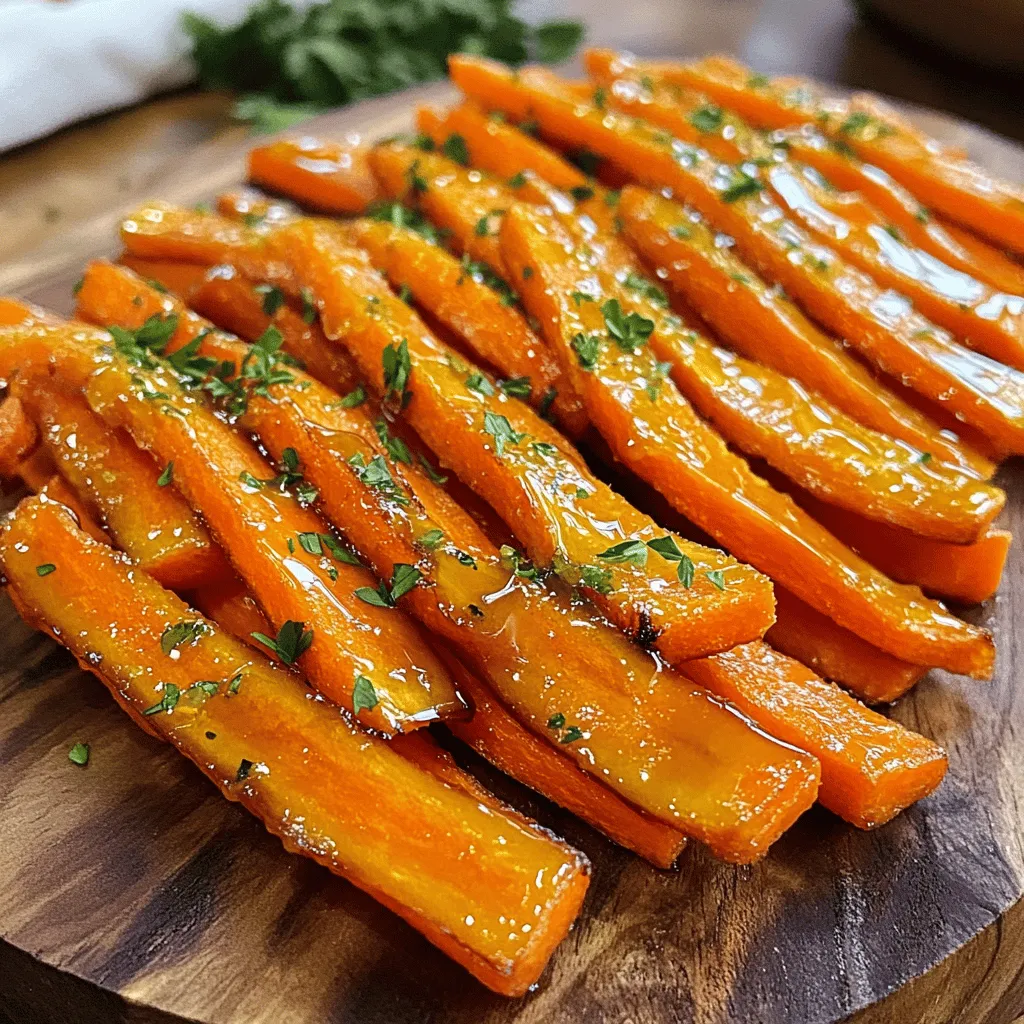
Looking for a snack that’s both simple and delicious? You’re in the right place! These maple glazed carrot fries are

- 1 lb ground turkey - 1/4 cup breadcrumbs (preferably Panko for extra crunch) - 1/4 cup grated Parmesan cheese (freshly grated for best flavor) - 2 tablespoons honey (local variety for added flavor) - 2 tablespoons Sriracha sauce (adjust based on your spice tolerance) - 1 tablespoon soy sauce (low-sodium if preferred) - 1/4 cup finely chopped green onions (white and green parts) - 2 cloves garlic, minced (or more if you love garlic) - 1 large egg (lightly beaten) The main ingredients are the heart of the meatballs. Ground turkey keeps them light. The Panko breadcrumbs add a nice crunch. Freshly grated Parmesan cheese gives a rich taste that pairs well with the turkey. For flavor, honey, Sriracha sauce, and soy sauce bring a sweet and spicy kick. Honey balances the heat of Sriracha, making the meatballs fun to eat. Soy sauce adds depth and umami, enhancing the overall flavor. Aromatics like green onions and garlic make the meatballs smell great and taste fresh. Green onions add a mild onion flavor, while garlic packs a punch. The egg helps bind everything together, ensuring the meatballs hold their shape while cooking. Mixing the base ingredients In a big bowl, combine 1 pound of ground turkey, 1/4 cup of breadcrumbs, and 1/4 cup of grated Parmesan cheese. Add 1/4 cup of finely chopped green onions and 2 minced garlic cloves. Then, pour in 1 lightly beaten egg. Mix these ingredients with your hands until just combined. Don’t overmix, or the meatballs will be tough. Preparing the sauce In a small bowl, whisk together 2 tablespoons of honey, 2 tablespoons of Sriracha sauce, 1 tablespoon of soy sauce, 1 teaspoon of salt, and 1/2 teaspoon of black pepper. Save a couple of tablespoons of this sauce for later. This will be used for glazing the meatballs. Prepping the skillet Heat a large skillet over medium heat. Add 1 tablespoon of olive oil and let it warm up until it shimmers. This helps the meatballs get a nice sear. Forming the meatballs With slightly damp hands, form the turkey mixture into meatballs. Each meatball should be about 1 to 1.5 inches wide. You will make around 20 meatballs. Make sure they are evenly sized for cooking. Searing the meatballs Place the meatballs in the skillet in a single layer. Give them space so they can cook evenly. Cook for about 5-6 minutes on one side, then flip them over. Cook the other side for another 5-6 minutes. Check that they reach an internal temperature of 165°F to ensure they are safe to eat. Glazing for added flavor In the last few minutes of cooking, brush the reserved honey-Sriracha glaze over the meatballs. Let them cook for an extra minute or two. This makes a sticky, tasty finish that enhances the flavor. - Ensuring proper meatball size: Make your meatballs about 1 to 1.5 inches. This size cooks evenly and is easy to eat. Use slightly damp hands to shape them. This prevents the mixture from sticking to your hands. - Avoiding overcrowding the pan: Cook meatballs in a single layer. If you crowd the pan, they won’t brown well. This keeps them juicy and gives them a nice texture. - Modifying spiciness with Sriracha: If you prefer less heat, use less Sriracha. You can start with one tablespoon. Taste the mixture before cooking. You can always add more sauce later if you want it spicier. - Substituting ingredients for dietary preferences: If you need a gluten-free option, swap breadcrumbs for gluten-free oats. For a lower-fat option, use ground chicken instead of turkey. Adjust the sauce to fit your taste and dietary needs. - Garnishing ideas: Drizzle more honey and Sriracha on top for a colorful finish. Sprinkle chopped green onions and sesame seeds for extra crunch and flair. These simple touches make a big difference in presentation. - Side dish pairings: Serve these meatballs with steamed rice or fresh veggies. They also pair well with a simple salad. This makes for a balanced meal that everyone will love. {{image_4}} You can swap out ground turkey for other meats. Ground chicken or beef works well. If you want a healthier option, use ground chicken. It has a similar taste and texture. You can also try ground pork for a richer flavor. For a vegan choice, use lentils or chickpeas. Mash them up, then mix with breadcrumbs and spices. This provides a great texture and taste. You can also use plant-based meat substitutes. These options make the dish friendly for everyone. You can add herbs and spices to make your meatballs unique. Fresh basil, parsley, or cilantro can enhance the taste. A dash of cumin or paprika adds warmth. You can even try adding ginger for a twist. In terms of sauces, mix up the honey and Sriracha. Try using teriyaki sauce for a sweet flavor. You can also use barbecue sauce for a smoky taste. Each change brings a new flavor to the dish. Serve the meatballs in a wrap for a fun meal. Use lettuce or tortilla wraps to hold the meatballs. Add extra sauce and some veggies for crunch. Another option is to serve the meatballs over rice or pasta. This gives a satisfying base. You can drizzle more honey or Sriracha on top before serving. Pair with a side salad for a fresh touch. To store your leftover honey Sriracha turkey meatballs, place them in an airtight container. This keeps the meatballs fresh and prevents odors from mixing. Make sure to let them cool to room temperature first. Proper sealing helps keep moisture in, which is key for great taste. You can safely store them in the fridge for up to four days. If you want to save some for later, freezing is a great option. Place the cooled meatballs on a baking sheet in a single layer and freeze until solid. This takes about an hour. Once frozen, transfer them to a freezer bag or airtight container. Label the bag with the date. To reheat, let them thaw in the fridge overnight. Then, heat them in the oven at 350°F (175°C) for about 15-20 minutes or until hot. In the fridge, these meatballs stay fresh for about four days. If you freeze them, they can last up to three months. Always check for spoilage before eating. Signs of spoilage include an off smell, discoloration, or a slimy texture. If you notice any of these, it’s best to discard the meatballs. To ensure your turkey meatballs are fully cooked, check their internal temperature. It should reach 165°F (74°C). Use a meat thermometer for the best results. You can also look for visual cues. The meatballs should be golden brown on the outside. Cut one open to check the inside. It should be no longer pink and juices should run clear. Yes, you can bake these meatballs! Preheat your oven to 400°F (200°C). Line a baking sheet with parchment paper. Place the meatballs on the sheet. Bake for about 20-25 minutes. Make sure to check their temperature as well. They should still reach 165°F (74°C) inside. To adjust the spice level, change the amount of Sriracha. For milder meatballs, use less Sriracha sauce. You can also add more honey to balance the heat. If you want them spicier, add extra Sriracha or mix in some crushed red pepper flakes. You can experiment with other spices too, like cayenne pepper or chili powder for a kick! In this blog, we covered how to make delicious honey Sriracha turkey meatballs. I shared key ingredients like ground turkey and Panko breadcrumbs, plus tips for flavor, cooking, and serving. Remember to adjust spice levels to fit your taste. Also, try different meats or vegan options to change things up. With these tips, you can master this recipe and impress anyone at your table. Enjoy your meal!

Honey Sriracha Turkey Meatballs Tasty and Simple Recipe

Are you ready for a flavor explosion? These Honey Sriracha Turkey Meatballs are both tasty and simple to make. With

- 2 cans (15 oz each) chickpeas, thoroughly drained and rinsed - 1 large onion, finely diced - 3 cloves garlic, minced - 2 medium-sized carrots, diced into small cubes - 1 bell pepper, preferably red or yellow, diced - 1 can (14 oz) of diced tomatoes with their juices - 2 cups of vegetable broth - 2 tablespoons of extra virgin olive oil - 2 teaspoons ground cumin - 1 teaspoon ground coriander - 1 teaspoon smoked paprika - ½ teaspoon ground cinnamon - 1 teaspoon turmeric - Fresh salt and black pepper to taste - 1 cup fresh spinach leaves, roughly chopped - ¼ cup fresh cilantro, finely chopped (for garnish) - ¼ cup raisins This stew has a rich and warm flavor. The spices like cumin and coriander create a savory base. Smoked paprika adds a slight depth, while cinnamon brings warmth. The tomatoes provide acidity, balancing the dish. Fresh spinach and cilantro add brightness. Finally, raisins offer a sweet contrast to the savory notes. If you don't have chickpeas, you can use lentils. They cook faster and are still healthy. For the broth, vegetable or chicken broth works well. If you like more heat, add a pinch of cayenne pepper. You can replace spinach with kale or Swiss chard. If you want a different texture, try adding sweet potatoes. 1. Heat 2 tablespoons of extra virgin olive oil in a large pot over medium heat. Wait until it shimmers. 2. Add 1 large, finely diced onion. Sauté it for about 5 minutes. You want it to be soft and fragrant. 3. Stir in 3 minced garlic cloves, 2 diced carrots, and 1 diced bell pepper. Cook for another 5 minutes. 4. Sprinkle in 2 teaspoons of ground cumin, 1 teaspoon of ground coriander, 1 teaspoon of smoked paprika, ½ teaspoon of ground cinnamon, and 1 teaspoon of turmeric. Stir well for 1-2 minutes. 5. Pour in 1 can of diced tomatoes with juices, 2 cups of vegetable broth, and 2 cans of rinsed chickpeas. Season with fresh salt and black pepper. 6. Increase heat until it boils gently. Then reduce to low. Cover and let cook for 25-30 minutes. 7. After simmering, stir in 1 cup of roughly chopped spinach and ¼ cup of raisins. Cook for 2-3 minutes until spinach wilts. 8. Taste and adjust seasoning if needed. Serve hot and garnish with ¼ cup of finely chopped cilantro. - Prep Time: 10 minutes - Cooking Time: 30 minutes - Total Time: 40 minutes - Servings: This recipe serves 4 people. - Use fresh spices for the best flavor. - Make sure to rinse the chickpeas well to remove any canning liquid. - Adjust salt and pepper to your taste before serving. - Serve with warm, crusty bread or fluffy couscous to soak up the stew. - Don't skip the cilantro garnish; it adds a fresh finish. To make your Moroccan chickpea stew shine, always start with fresh veggies. Use ripe tomatoes and crisp bell peppers. Sauté your onions until soft, as this builds a great base. Don't rush the spice step; let them bloom for flavor. This helps release their oils and aroma. Lastly, taste your stew before serving. Adjust the seasoning for the best results. For this stew, a large pot or Dutch oven works best. It holds heat evenly and allows for slow cooking. A sharp knife helps with chopping vegetables quickly. Use a cutting board to keep your counters clean. A wooden spoon is great for stirring and mixing. Having measuring spoons ensures your spices are just right. If you prefer a milder stew, use less smoked paprika and cumin. You can add a pinch of sugar to balance flavors if it's too spicy. If you like heat, add a dash of cayenne or chili flakes. Always add spices slowly, tasting as you go. This way, you can find the perfect heat level for your palate. {{image_4}} You can add protein to your Moroccan chickpea stew for more flavor and nutrition. Here are some great choices: - Chicken: Diced chicken breast works well. Add it after the onions and cook until browned. - Lamb: Ground lamb adds a rich taste. Brown it before adding the veggies. - Fish: Firm fish like cod or salmon can be added in the last 10 minutes. - Tofu: For a plant-based option, use extra-firm tofu. Cube it and sauté with the veggies. These proteins blend well with the spices and create a hearty meal. This stew is easy to make vegetarian or vegan. Here are some ideas: - Vegetarian: Stick to the original recipe. Just make sure to use vegetable broth. - Vegan: The recipe is already vegan. All ingredients are plant-based. - Add more veggies: Consider adding zucchini, sweet potatoes, or peas for extra color and nutrients. These adaptations keep the stew both healthy and delicious. Chickpea stew varies by region, adding unique flavors. Here are some interesting twists: - Spanish: Add chorizo and saffron for a smoky, rich taste. - Italian: Include diced tomatoes, basil, and a splash of balsamic vinegar. - Indian: Spice it up with garam masala, ginger, and coconut milk for a creamy texture. - Middle Eastern: Use tahini, lemon juice, and serve with pita bread for a zesty kick. Each regional twist brings new life to your chickpea stew. To keep your Moroccan chickpea stew fresh, store it in an airtight container. Let the stew cool down first. Once it’s cool, seal it well. Place it in the fridge. It will last for about 3 to 5 days. If you want to enjoy it later, consider freezing it. When you're ready to eat, you can reheat the stew easily. Pour it into a pot. Heat it over low to medium heat. Stir it often to avoid sticking. If it seems thick, add a splash of water or broth. You can also microwave it. Use a microwave-safe bowl. Heat it for 1-2 minutes, stirring halfway through. If you have extra stew, freezing is a great option. Divide the stew into portions. Use freezer-safe bags or containers. Remove as much air as you can. Label each bag with the date. The stew can stay in the freezer for up to 3 months. When you want to eat it, thaw it overnight in the fridge. Then, reheat it as described above. Enjoy the flavors all over again! To make Moroccan Chickpea Stew, heat olive oil in a pot. Add diced onion and cook until soft. Next, stir in garlic, carrots, and bell pepper. Cook for five more minutes. Then, add spices like cumin, coriander, and paprika. Mix well and cook for another two minutes. Pour in diced tomatoes and vegetable broth. Add rinsed chickpeas and season with salt and pepper. Bring to a boil, then simmer for 25-30 minutes. Finally, stir in spinach and raisins. Cook until spinach wilts. Serve hot with fresh cilantro on top. Yes, you can use dried chickpeas. Just soak them overnight. The next day, cook them until tender. This will take about 1-2 hours. After they soften, drain and rinse them. Then, follow the same steps as the canned chickpeas in the recipe. Using dried chickpeas adds a fresh taste and a great texture. You can serve this stew with warm, crusty bread. It soaks up the flavors well. Fluffy couscous is another great choice. You can also add a side salad for crunch. A dollop of yogurt on top can make it creamier and balance the spices. Enjoy your meal! Moroccan Chickpea Stew is a dish full of flavor and good for you. We covered ingredients, cooking steps, and tips for success. I shared ways to change the recipe and store leftovers well. You can make this stew your own by trying different proteins or spices. Remember, cooking should be fun! Enjoy experimenting with these ideas. This dish is simple and delicious, perfect for all.

Moroccan Chickpea Stew Flavorful and Easy Recipe

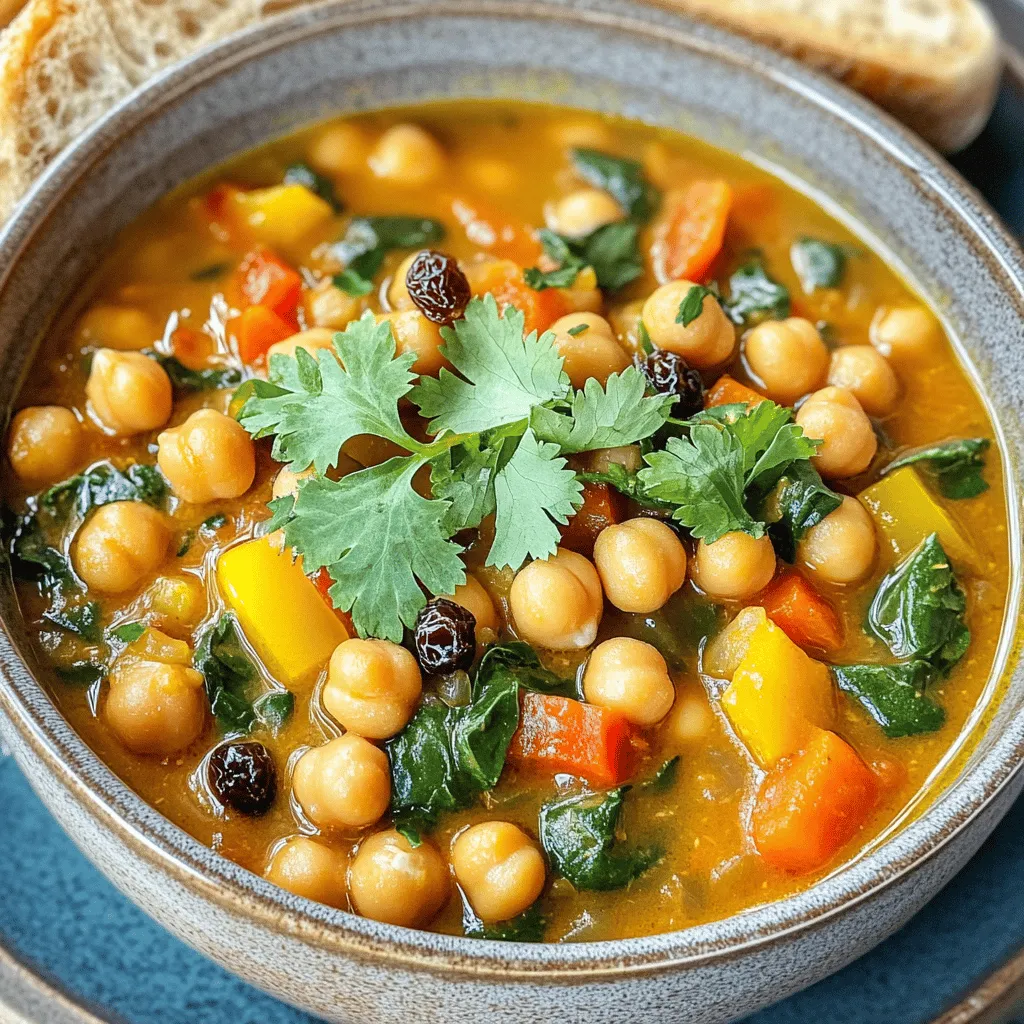
Are you ready to spice up your dinner routine? This Moroccan Chickpea Stew is flavorful, easy to make, and packed

The base of your Cheddar Jalapeño Cornbread Muffins includes these key items: - 1 cup cornmeal - 1 cup all-purpose flour - 1 tablespoon baking powder - 1/2 teaspoon salt - 1/2 teaspoon baking soda - 1/4 cup granulated sugar These ingredients create a light and fluffy texture. Cornmeal gives a lovely grainy feel. Flour adds structure. Baking powder and baking soda help them rise, while sugar adds a touch of sweetness. Next, we need to add moisture and richness: - 1 cup buttermilk (or regular milk) - 2 large eggs - 1/4 cup vegetable oil Buttermilk adds a nice tang. Eggs bind everything together, and oil keeps the muffins moist. This mix makes a creamy batter that helps the muffins rise well. Now, it’s time to add a burst of flavor: - 1 cup shredded sharp cheddar cheese - 1 to 2 jalapeños, finely chopped (seeds removed for milder flavor) - 1/4 cup corn kernels (can use fresh or frozen) Sharp cheddar gives a rich taste. Jalapeños add heat, which you can adjust by removing the seeds. Corn kernels bring a sweet crunch. Together, these add-ins elevate your muffins and make each bite enjoyable. Set your oven to 400°F (200°C). Grease a muffin tin for 12 muffins. You can also use paper liners for easy removal. In a large mixing bowl, add the cornmeal, flour, baking powder, salt, baking soda, and sugar. Whisk these dry ingredients together well. This helps to mix everything evenly. You want the flavors to be uniform in each bite. In another bowl, combine the buttermilk, eggs, and vegetable oil. Whisk until the mixture is smooth. This smooth texture will help your muffins rise nicely. Gently pour the wet mixture into the dry ingredients. Use a spatula to stir until just combined. Be careful not to overmix. A few lumps are okay! Overmixing can make your muffins tough. Now, fold in the shredded cheese, chopped jalapeños, and corn. Make sure these tasty bits are spread evenly through the batter. Each muffin should have a burst of flavor! Scoop the batter into the prepared muffin tin. Fill each cup about two-thirds full. This gives the muffins room to rise. Bake in your preheated oven for 15-18 minutes. They should look golden brown on top. A toothpick should come out clean when inserted in the center. After baking, let the muffins cool in the tin for about 5 minutes. Then, move them to a wire rack to cool completely. For a lovely touch, serve them warm in a basket lined with a colorful cloth. Add a dollop of butter or drizzle of honey on top for extra flavor! To avoid dense muffins, make sure not to overmix the batter. When you combine the wet and dry ingredients, stir gently until just combined. A few lumps are fine. Overmixing makes the muffins tough. Use a spatula to fold in the cheese and jalapeños; this keeps the texture light and fluffy. You can modify the jalapeño quantity to suit your taste. For a mild flavor, use one jalapeño and remove the seeds. If you love heat, add two jalapeños or use a spicier variety. Just remember that fresh peppers can vary in heat! Check for doneness by inserting a toothpick into the center of a muffin. It should come out clean. If it has batter on it, bake a few more minutes. Also, rotate the muffin tin halfway through baking for even heat. This helps all your muffins rise and bake perfectly! {{image_4}} You can add fresh herbs to your muffins. Herbs like cilantro or chives bring a nice twist. Chop them finely and mix them in with the cheese and jalapeños. This adds a fresh, bright flavor. You can try using one or a mix of your favorite herbs. It’s a simple way to change the taste. If you need a gluten-free version, you can use gluten-free flour. Many brands have blends that work well for baking. Simply replace the all-purpose flour with gluten-free flour. The muffins will still turn out soft and tasty. Just follow the same instructions, and you’ll enjoy a great treat. For a sweet touch, add honey or maple syrup. You can mix in about 1/4 cup of either. This will give your muffins a nice sweetness. It balances the spice from the jalapeños perfectly. These sweet muffins are great for breakfast or as a snack. The combination of sweet and spicy is truly delightful. To keep your Cheddar Jalapeño Cornbread Muffins fresh, store them in an airtight container. This keeps moisture in and prevents them from getting stale. Place a paper towel inside the container to absorb extra moisture. You can store them at room temperature for up to two days. If you want them to last longer, refrigerate them for up to a week. When you want to enjoy your muffins again, reheating is key. The best method is to use the oven. Preheat your oven to 350°F (175°C). Place the muffins on a baking sheet and heat for about 5-7 minutes. This method helps keep the muffins fluffy. You can also use a microwave, but be careful. Heat them in 10-second bursts to avoid making them tough. Freezing these muffins is a great option for later. First, let them cool completely. Then, wrap each muffin in plastic wrap. Place the wrapped muffins in a freezer bag. Squeeze out as much air as possible before sealing. They can last up to three months in the freezer. To thaw, just take them out and leave them at room temperature for a couple of hours. You can also reheat them directly from the freezer, but add a few extra minutes to your heating time. Yes, you can. Regular milk works well in this recipe. Buttermilk adds a tangy flavor and moisture. If you want a similar taste, add a splash of lemon juice or vinegar to the milk. Let it sit for a few minutes. This will mimic buttermilk's acidity. This small change keeps your muffins soft and tasty. To add heat, use more jalapeños. Start with one and add up to two. Make sure to chop them finely. If you want even more spice, consider adding red pepper flakes or cayenne pepper. These spices can boost the flavor without changing the texture. Just remember, taste as you go to find your perfect heat level. These muffins pair wonderfully with chili or soup. They also go great with barbecued meats. You can serve them alongside a fresh salad for a light meal. Consider spreading butter or honey on top for added flavor. Each bite will be a flavorful delight! When stored correctly, these muffins last up to three days at room temperature. Keep them in an airtight container to maintain freshness. You can also store them in the fridge for up to a week. If you want to enjoy them later, freeze them. Wrap each muffin tightly and place them in a freezer-safe bag. They can last for up to three months in the freezer. In this post, we explored how to make delicious Cheddar Jalapeño Cornbread Muffins. We covered essential ingredients, step-by-step instructions, and helpful tips to perfect your muffins. Plus, we shared fun variations and storage methods to keep them fresh. These muffins are not only tasty but also easy to customize. Enjoy them with your favorite meals, or savor them as snacks. Happy baking, and may your muffins always rise to the occasion!

Cheddar Jalapeño Cornbread Muffins Flavorful Delight

Are you ready to take your muffin game to the next level? Cheddar Jalapeño Cornbread Muffins bring the perfect mix

- 2 medium zucchinis, spiralized into zoodles - 1 lb large shrimp, peeled and deveined - 4 cloves garlic, finely minced - 1 lemon, zested and juiced - 2 tablespoons olive oil - 1/4 teaspoon red pepper flakes (optional) - Salt and freshly ground black pepper, to taste - Fresh parsley, chopped, for garnish These main ingredients create a fresh and light dish. Zucchinis serve as a great low-carb base. Shrimp adds protein and a lovely texture. Garlic gives a strong, tasty punch. Lemon juice brightens the whole dish, making it vibrant. - A pinch of smoked paprika - Fresh basil or oregano for herbs - Cherry tomatoes for sweetness - Grated Parmesan for a cheesy touch Adding these extra flavors can enhance your meal. Smoked paprika gives depth, while herbs add freshness. Cherry tomatoes bring a sweet burst, and cheese adds creaminess. - Choose firm zucchinis without soft spots. Fresh zucchinis have a bright color. - Look for shrimp that is firm and smells fresh. Avoid shrimp with a strong fishy odor. - Use fresh garlic for the best flavor. Dried garlic lacks the same punch. - Opt for a fresh lemon. A bright yellow lemon gives the best juice and zest. Selecting high-quality ingredients makes a big difference in taste. Freshness leads to better results, so keep this in mind when shopping. First, take your two zucchinis. Grab a spiralizer and start turning the zucchinis into zoodles. Aim for thin strands. This makes the dish light and fun. After spiralizing, place the zoodles in a colander. Let them sit for a bit. This helps drain extra water. A dry zoodle means a better dish! Next, heat a large skillet over medium-high heat. Add one tablespoon of olive oil. Season your one pound of shrimp with salt, black pepper, and red pepper flakes if you like some heat. Put the shrimp in the skillet. Cook them for about 2-3 minutes on each side. They should turn pink and opaque. Once cooked, take the shrimp out and set them aside on a plate. In the same skillet, add another tablespoon of olive oil. Toss in four cloves of finely minced garlic. Sauté for about 30 seconds. You want it fragrant, but keep an eye on it! Burnt garlic can ruin your dish. Now, add the zoodles to the skillet with the garlic. Toss gently for 2-3 minutes. The zoodles should soften but still have some crunch. Finally, return the shrimp to the skillet. Pour in the lemon zest and juice. Gently toss everything together. Let it cook for one more minute. This helps the flavors mix well. To keep your zoodles crisp, drain them after spiralizing. Use a colander and let them sit for about 10 minutes. This helps remove extra water. You can also pat them dry with a towel. Cooking them for only 2-3 minutes in the skillet will keep them crunchy. If you overcook them, they'll turn mushy. Cook your shrimp just right. Start with a hot skillet and add the shrimp in a single layer. They need about 2-3 minutes on each side. When they turn pink and opaque, they are done. If you overcook shrimp, they become rubbery and tough. Always check for that perfect pink color. To boost flavor, add fresh herbs like basil or cilantro. A splash of white wine can also enhance the dish. Pairing zoodles with a side salad adds texture and freshness. You can even serve with crusty bread to soak up the juices. If you like heat, sprinkle more red pepper flakes on top for a nice kick. {{image_4}} If you want to keep it low-carb, swap zoodles for other veggies. Try using spaghetti squash. It gives a similar texture. You can also use cauliflower rice for a grain-free option. Both add great flavor without the carbs. You can add more veggies to your dish for extra nutrients. Bell peppers, spinach, or cherry tomatoes work well. Just chop them up and sauté them with the garlic. This adds color and makes the meal healthier. Want a kick? Add more heat with jalapeños or chili paste. You could also mix in sriracha for a spicy twist. Just adjust the amount to fit your taste. This makes the dish exciting and fun! To keep your Lemon Garlic Shrimp Zoodles fresh, store them in an airtight container. Make sure to let the dish cool down before sealing. This helps prevent steam build-up, which can make the zoodles soggy. You can keep them in the fridge for up to three days. When reheating, use a skillet over medium heat. Add a splash of water or olive oil to help keep the zoodles moist. Stir gently while heating for about 3-5 minutes. Avoid the microwave, as it can make the zoodles mushy. If you want to freeze your zoodles, it’s best to freeze the shrimp and zoodles separately. Cook the shrimp and let them cool. Place them in freezer bags, removing as much air as possible. For zoodles, spiralize and blanch them in boiling water for one minute before freezing. This method helps keep their texture. You can freeze both for up to two months. When ready to eat, thaw in the fridge overnight and reheat as described. Yes, you can use frozen shrimp. Just thaw them first. Place the shrimp in cold water for about 15-20 minutes. This keeps the shrimp tender. After thawing, peel and devein them if needed. Then, you can follow the recipe as usual. You can make zoodles without a spiralizer by using a vegetable peeler. Simply peel long strips of zucchini until you reach the seeds in the center. You can also use a box grater. Grate the zucchini to get thin, noodle-like strands. Both methods work well for this dish. Lemon Garlic Shrimp Zoodles pair well with several sides. Here are a few ideas: - A fresh green salad with lemon vinaigrette - Garlic bread for a crunchy texture - Quinoa or brown rice for a filling option - Grilled vegetables for extra flavor These sides enhance the meal while keeping it light and tasty. Lemon Garlic Shrimp Zoodles are simple and tasty. We explored key ingredients, tips for great cooking, and easy variations. You learned how to spiralize zucchini and cook shrimp right. I shared ways to prevent soggy zoodles and enhance flavor. This dish is easy to store and reheat, making it perfect for meal prep. Try it with your favorite sides or add extra veggies for more nutrition. Enjoy the bright flavors of this dish and let it brighten up your meals!

Lemon Garlic Shrimp Zoodles Quick and Easy Recipe

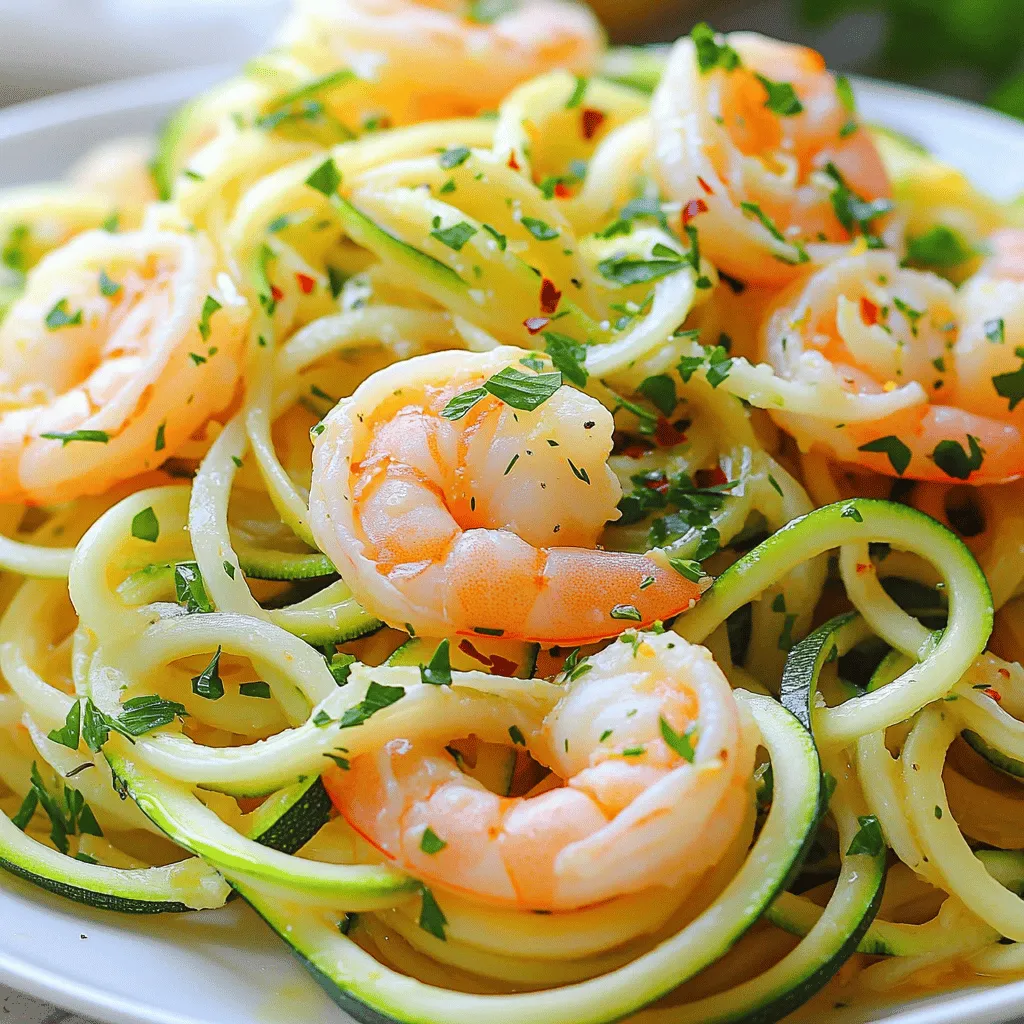
Looking for a quick and tasty dinner fix? Try my Lemon Garlic Shrimp Zoodles recipe! It’s simple to make, packed

Older posts
Newer posts
← Previous Page1 … Page20 Page21 Page22 … Page83 Next →

dsad

© 2026 eataroundit • Built with GeneratePress

Our Policies

  • Copyright Policy
  • Cookie Policy
  • GDPR Policy
  • Privacy Policy
  • Disclaimer
  • Terms Of Use

More Information

  • Home
  • About
  • Contact
  • Appetizers
  • Dessert
  • Dinner
  • Drinks
©2026, eataroundit About Back To Top