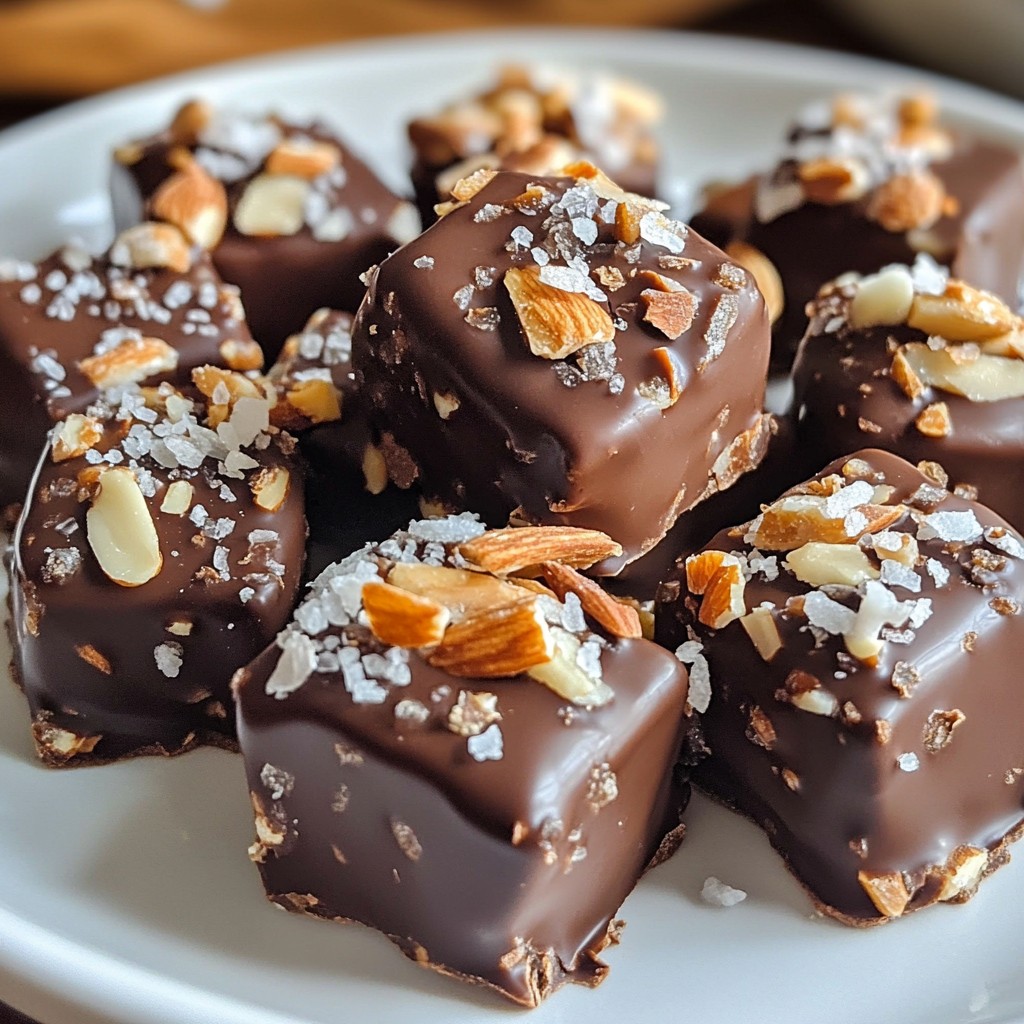
Are you ready to indulge without the sugar? My Crunchy Sugar-Free Dark Chocolate Almond Clusters will satisfy your cravings and delight your taste buds! Packed with wholesome ingredients like raw almonds and rich dark chocolate, these clusters are easy to make and perfect for any occasion. Join me as I guide you step-by-step to create a treat that’s both healthy and delicious. Let’s get started!
Why I Love This Recipe
- Deliciously Healthy: This recipe uses sugar-free dark chocolate and raw almonds, making it a guilt-free treat that satisfies your sweet tooth.
- Simple Preparation: With just a few easy steps, you can create these delightful clusters without any complicated techniques or hard-to-find ingredients.
- Customizable Add-ins: Add your favorite ingredients like coconut flakes or dried fruit to make these clusters uniquely yours!
- Perfect for Gifting: These clusters make a beautiful homemade gift, especially when beautifully packaged and shared with friends and family.
Ingredients
Here is what you need for Crunchy Sugar-Free Dark Chocolate Almond Clusters:
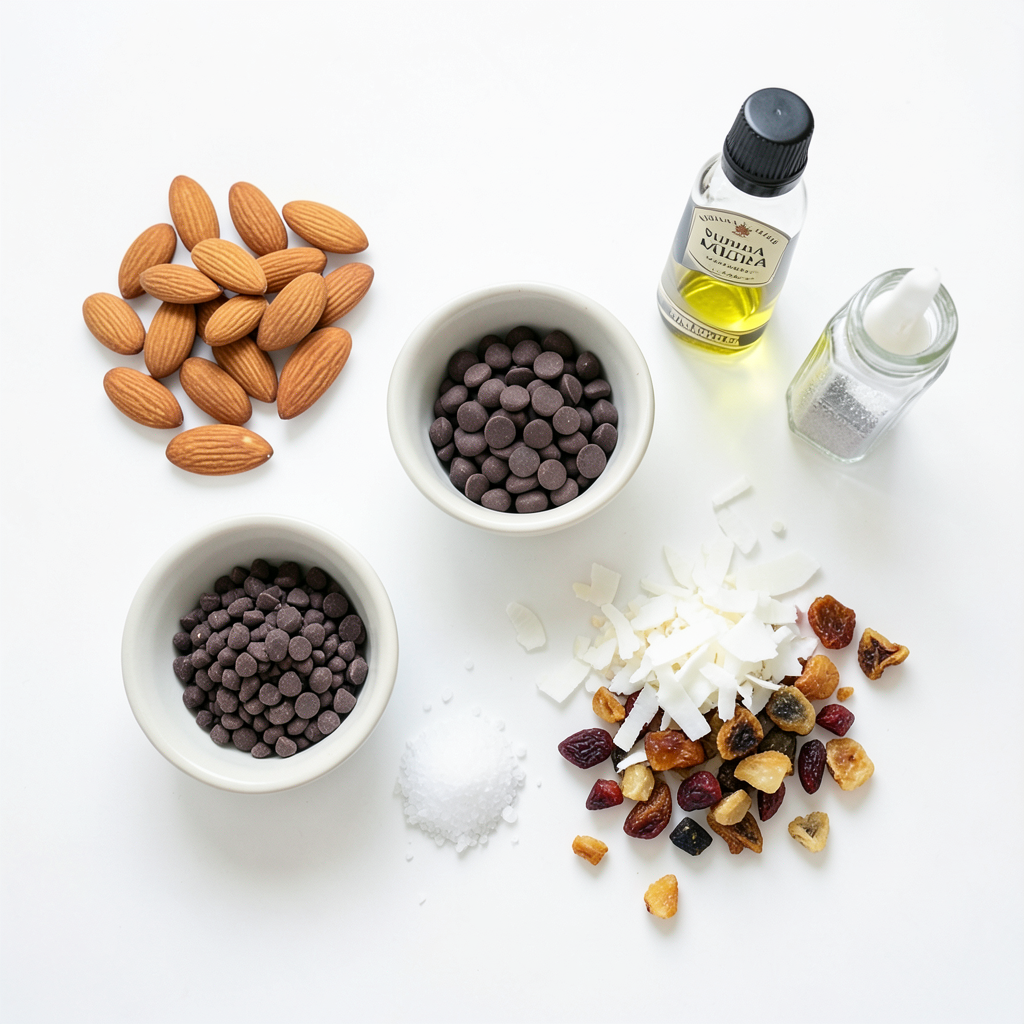
- 1 cup raw almonds
- 1 cup sugar-free dark chocolate chips
- 1 tablespoon coconut oil
- 1 teaspoon vanilla extract
- Sea salt for sprinkling
- 1/4 cup chopped unsweetened coconut flakes (optional)
- 1/4 cup chopped dried fruit (e.g., apricots or cranberries, optional)
These ingredients create a delightful blend of flavors and textures. Raw almonds give a nice crunch. The sugar-free dark chocolate keeps it rich without added sugar. Coconut oil helps the chocolate melt smoothly. Vanilla extract adds a warm flavor that enhances the chocolate.
You can add optional coconut flakes for extra texture. Chopped dried fruit gives a sweet burst. Mixing these ingredients brings joy to your kitchen. Enjoy making these clusters!
Step-by-Step Instructions
Preparation Steps
- Preheat the oven: Start by setting your oven to 350°F (175°C). This helps toast the almonds just right.
- Toast the almonds: Spread 1 cup of raw almonds on a baking sheet. Toast them for 10-12 minutes. Keep an eye on them and stir halfway. Look for a light golden color and a nice aroma.
- Allow the almonds to cool: Once toasted, take them out and let them cool for a few minutes. This step is key for a crunchy texture.
Chocolate Melting Technique
- Combine chocolate chips and coconut oil: In a microwave-safe bowl, add 1 cup of sugar-free dark chocolate chips and 1 tablespoon of coconut oil.
- Melt in intervals; avoid overheating: Heat the bowl in the microwave for 30 seconds, then stir. Repeat until melted and smooth. This will keep your chocolate glossy.
- Add vanilla extract: Once melted, stir in 1 teaspoon of vanilla extract. This boosts the flavor and makes it even more delicious.
Forming and Setting the Clusters
- Coat almonds with chocolate mixture: In a large bowl, add the toasted almonds to the melted chocolate. Mix well until all almonds are coated.
- Create clusters on parchment paper: Line a baking sheet with parchment paper. Use a spoon to scoop out the chocolate-coated almond mixture and drop it onto the sheet, forming small clusters.
- Sprinkle with sea salt: After forming all clusters, lightly sprinkle sea salt on each one. This adds a nice touch and balances the sweetness.
- Chill in refrigerator to set: Place the baking sheet in the fridge for about 30 minutes. This helps the chocolate harden and set perfectly.
Tips & Tricks
Mastering Chocolate Melting
To melt chocolate without ruining it, use a microwave.
- Start with 30-second bursts.
- Stir after each time to help the heat spread.
- Remove it from the microwave when it looks shiny but not fully melted.
A glossy texture shows perfect melting. If it looks dull, it may be overheated.
- Add a teaspoon of coconut oil to help keep it smooth.
- Stir well to blend it in.
Perfecting the Cluster Shape
To form even clusters, use a spoon.
- Scoop out a spoonful of the mixture.
- Drop it onto the baking sheet in small mounds.
Keep space between the clusters. This will help them hold their shape.
- Aim for about 2 inches apart.
- This spacing allows them to set without sticking together.
Serving Suggestions
Presentation can make your clusters pop!
- Use a pretty plate to show off the clusters.
- A light sprinkle of sea salt adds flair and taste.
For gifts, wrap them in clear bags.
- Tie each bag with a cute ribbon.
- This makes a charming and tasty gift for friends or family.
Pro Tips
- Chill for Better Texture: Allow the clusters to chill in the refrigerator longer than 30 minutes for an extra firm texture that’s perfect for snacking.
- Experiment with Flavors: Don’t hesitate to add spices like cinnamon or a dash of cayenne to the chocolate mixture for a unique flavor twist.
- Quality Chocolate Matters: Choose high-quality sugar-free dark chocolate chips to ensure a rich and satisfying flavor in your clusters.
- Store Properly: Keep your clusters in an airtight container to maintain their crunchiness and prevent any moisture from getting in.
Variations
Flavor Enhancements
You can change the taste of these clusters with fun add-ins. Adding a few drops of almond extract gives a nice twist. You can also use different nuts or seeds. Think about walnuts or pumpkin seeds for a new crunch.
Texture Alternatives
If you want a different texture, consider adding crispy rice cereal. It makes the clusters light and airy. You can also mix in spices like cinnamon or cayenne for warmth. This gives the clusters a unique kick that surprises your taste buds.
Dried Fruit Options
Dried fruits can add sweetness and color. Try adding chopped apricots or cranberries for a pop of flavor. For seasonal fun, use dried mango in summer or dried apples in fall. Each dried fruit brings its own special taste to your clusters.
Storage Info
Optimal Storage Conditions
Store your crunchy clusters in airtight containers. This keeps them fresh and tasty. You can use glass jars or plastic containers with tight seals. For the best results, place them in the fridge. This helps maintain their crispness. If you choose room temperature, make sure it’s cool and dry.
Shelf-Life Expectations
These clusters stay fresh for about two weeks. To enjoy the best flavor, eat them within the first week. After that, they may lose some crunch and taste. If you notice any changes in texture or smell, it’s time to toss them out.
Reusing or Repurposing Clusters
Get creative with your clusters! You can chop them and add them to desserts. Try them in yogurt or ice cream for a crunchy topping. You can also mix them into trail mix or sprinkle them on pancakes. The options are endless!
FAQs
Can I substitute ingredients?
Yes, you can swap ingredients easily. For chocolate, try using sugar-free milk chocolate chips. If you want nuts, pecans or walnuts work well too. You can even use seeds like pumpkin or sunflower for a nut-free version.
Are these clusters truly sugar-free?
Yes, they are sugar-free! The recipe uses sugar-free dark chocolate chips, which have no added sugar. These chips often contain sugar alcohols or stevia, making them a great choice for low-sugar diets.
What is the best way to melt chocolate?
To melt chocolate well, use a microwave-safe bowl. Combine chocolate chips with coconut oil. Heat in 30-second bursts. Stir after each interval to keep it smooth. Avoid overheating to keep the chocolate shiny and soft.
How can I make them vegan?
To make these clusters vegan, ensure your chocolate chips are dairy-free. Check the label for any milk ingredients. Use coconut oil as it’s plant-based, and you’re all set!
These chocolate almond clusters are simple and tasty. You start with basic ingredients and follow easy steps. The tips help you melt chocolate well and make nice shapes. Plus, you can mix things up with different nuts, fruits, and spices. For storage, keep them in airtight containers for longer freshness.
Enjoy making and sharing these clusters. They are great for snacks or gifts. You can feel proud of creating a sweet treat that fits your needs. Dive in and enjoy your tasty creations!