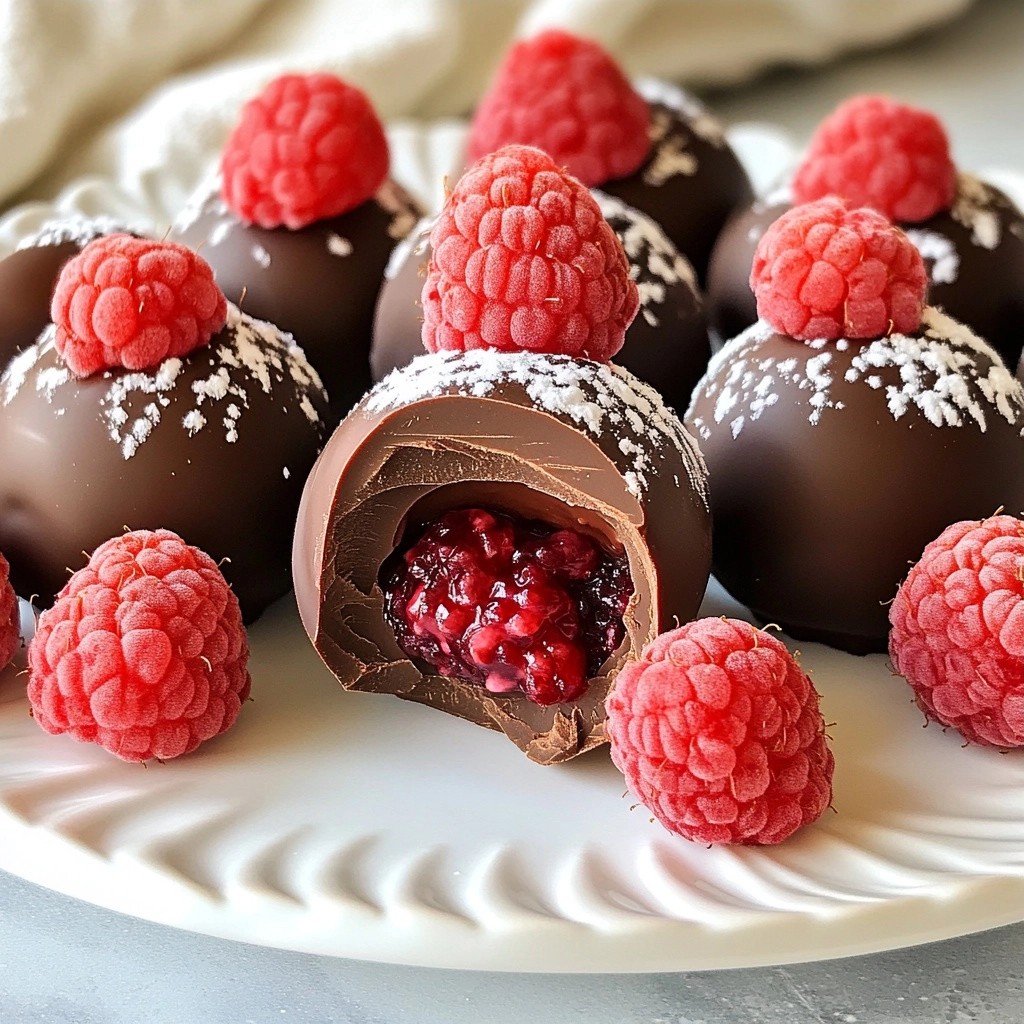
Indulging in rich, chocolatey treats doesn’t have to come at the cost of your health. These Sugar-Free Chocolate Raspberry Truffle Bites pack flavor without the sugar crash. Made with simple, wholesome ingredients, they are perfect for satisfying your sweet cravings guilt-free. Join me as we explore the easy steps to create these delightful truffles, while discovering tips to customize and store them for future enjoyment. Let’s get started!
Why I Love This Recipe
- Deliciously Decadent: These truffle bites are rich and indulgent, satisfying chocolate cravings without the sugar.
- Easy to Make: With simple ingredients and straightforward steps, anyone can whip up these delightful treats in no time.
- Healthy Twist: Using sugar-free chocolate and coconut cream, these truffles are a guilt-free option for dessert lovers.
- Versatile Presentation: They can be elegantly displayed for special occasions or enjoyed as a casual snack, making them a versatile treat.
Ingredients
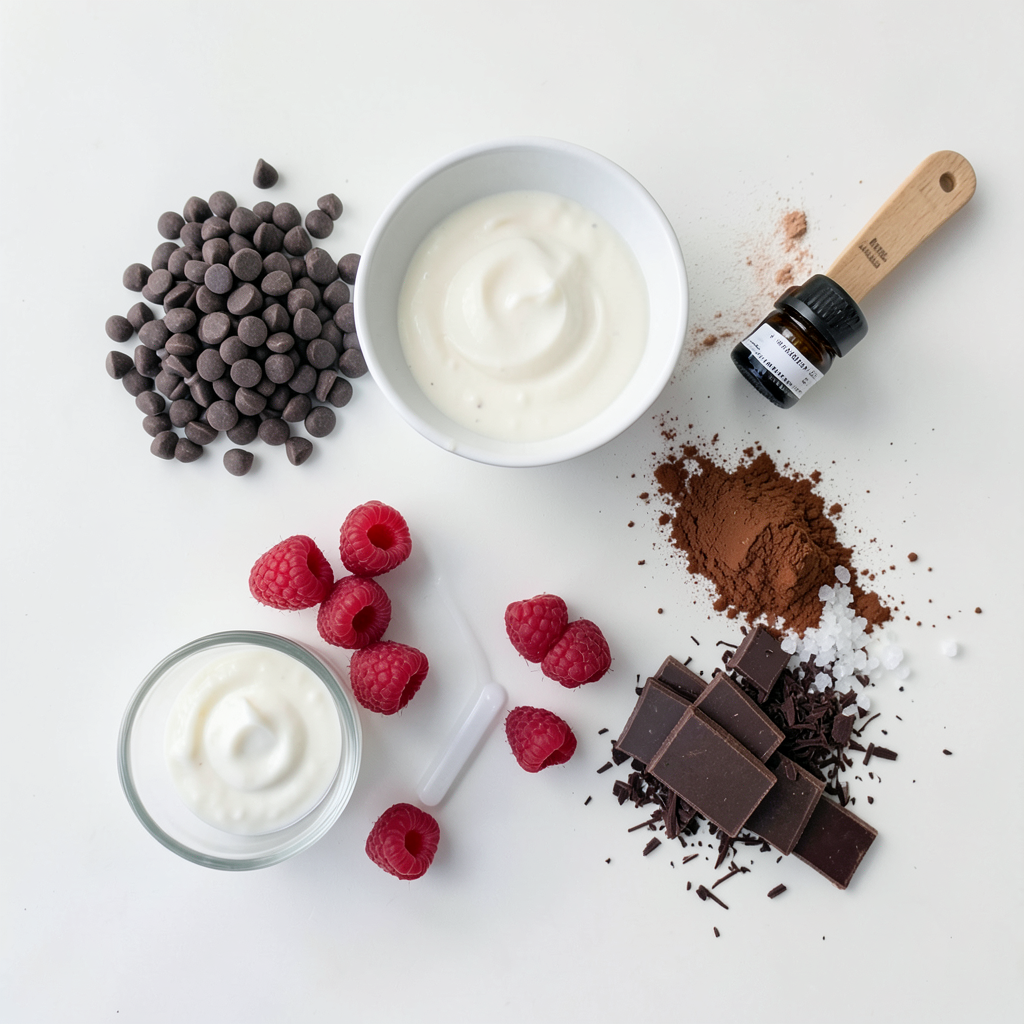
Here’s what you need for Sugar-Free Chocolate Raspberry Truffle Bites. Each ingredient plays a special role in creating this treat.
- 1 cup sugar-free dark chocolate chips
- ½ cup coconut cream (chilled)
- 1 cup fresh raspberries, plus extra for garnish
- 1 teaspoon vanilla extract
- ¼ cup unsweetened cocoa powder
- A pinch of sea salt
- 1 tablespoon finely grated dark chocolate (for decoration)
These ingredients work together to create a rich, creamy, and fruity flavor. The sugar-free dark chocolate chips give a deep chocolate taste without added sugar. Coconut cream adds creaminess and a slight sweetness. Fresh raspberries bring bright flavor and a hint of tartness. Vanilla extract enhances the overall flavor. Unsweetened cocoa powder gives a nice dusting while sea salt balances the sweetness. Finally, grated dark chocolate adds a lovely finish.
Gather these ingredients before you start. Having everything ready makes cooking fun and easy!
Step-by-Step Instructions
How to Melt the Chocolate
Using a Microwave
To melt the chocolate, start by placing the sugar-free dark chocolate chips in a microwave-safe bowl. Heat them in the microwave for 20 seconds at a time. Stir well each time. Keep heating until the chocolate is smooth and melted.
Alternative Melting Methods (Double Boiler)
You can also melt chocolate using a double boiler. Fill a pot with water and bring it to a simmer. Place a heat-safe bowl on top, making sure it doesn't touch the water. Add the chocolate chips to the bowl. Stir until melted and smooth.
Preparing the Raspberry Mixture
Combining Ingredients
In a separate bowl, mix chilled coconut cream, fresh raspberries, vanilla extract, and a pinch of sea salt. Use a fork to gently mash the raspberries. Leave some small chunks for a nice texture.
Tips for Textural Consistency
Be careful not to over-mash the raspberries. You want a mix of smooth and chunky for better bites. This adds depth to your truffles.
How to Combine and Chill the Mixture
Proper Mixing Techniques
When the chocolate cools slightly, fold it into the raspberry mixture. Use a spatula to combine everything. Stir until it becomes thick and smooth.
Refrigeration Time
Cover the bowl with plastic wrap. Place it in the fridge for at least one hour. This helps the mixture firm up, making it easier to scoop.
Shaping and Coating the Truffles
Techniques for Forming Balls
After chilling, use a small cookie scoop or your hands to make bite-sized balls. If the mixture sticks to your hands, it’s okay.
Dusting Hands with Cocoa Powder
Lightly dust your hands with unsweetened cocoa powder. This prevents sticking and makes shaping easier.
Setting the Truffles
Importance of Refrigeration
Put the truffles on a parchment-lined baking sheet. Refrigerate them for about 30 minutes. This helps them set completely.
Tips for Storing on Baking Sheets
Make sure they have space between them on the sheet. This keeps them from sticking together.
Garnishing and Serving
Presentation Ideas
Just before serving, add a fresh raspberry on top of each truffle. This makes them look extra special.
Enhancing Visual Appeal
Arrange the truffles on a nice plate. Scatter some whole fresh raspberries around them for color and charm. Enjoy!
Tips & Tricks
Common Mistakes to Avoid
- Overheating Chocolate: Always melt chocolate in short bursts. The heat can change its texture. If you overheat, chocolate can seize up. Stir well after each burst to keep it smooth.
- Insufficient Chilling Time: Don't skip chilling! It helps the truffle mix firm up. If you don't chill long enough, the truffles will be too soft to shape.
Best Practices for Ingredient Substitutions
- Alternatives for Coconut Cream: If you can't find coconut cream, use full-fat coconut milk. It works well but may need more chilling to thicken. You can also try cashew cream for a different flavor.
- Choosing the Right Cocoa Powder: Use high-quality unsweetened cocoa powder. It adds richness and depth. Look for brands with no added sugars or fillers for the best taste.
Enhancing Flavor and Texture
- Adding Extra Ingredients: Mix in chopped nuts or seeds for crunch. Walnuts or almonds pair nicely with chocolate and raspberry. You can also add a touch of espresso powder for a coffee kick.
- Adjusting Sweetness: If you want a sweeter truffle, add a bit of liquid stevia or erythritol. Start with a small amount and taste as you go. You can always add more, but you can’t take it out!
Pro Tips
- Use Quality Chocolate: The flavor of your truffles largely depends on the quality of the chocolate. Choose a high-quality sugar-free dark chocolate for the best taste.
- Chill the Coconut Cream: Make sure your coconut cream is well-chilled before mixing. This will help achieve a thicker texture and a richer flavor.
- Experiment with Flavors: Feel free to add different flavor extracts like almond or orange to the mixture for a unique twist on the classic chocolate-raspberry combo.
- Storage Tips: Store the truffles in an airtight container in the fridge. They will keep well for up to a week, maintaining their rich texture and flavor.
Variations
Adding Different Flavors
You can make the truffles even more fun by adding flavors. Here are two great options:
- Citrus Zest: Adding a little citrus zest gives a fresh taste. Use zest from oranges or lemons. Just a teaspoon adds a bright touch to the truffles.
- Nut Butters: Swirl in your favorite nut butter for richness. Almond or peanut butter works well. This adds creaminess and a nutty flavor to the bites.
Making It Vegan
If you want to make these truffles vegan, it’s easy! Here are some great substitutions:
- Coconut Cream: Use a plant-based cream, like cashew cream, instead. It keeps the truffles creamy.
- Chocolate Chips: Choose sugar-free dark chocolate chips that are dairy-free. Many brands offer vegan options now.
Using Different Coatings
Coatings can change the look and taste of your truffles. Try these fun options:
- Toasted Coconut Flakes: Roll the truffles in toasted coconut flakes for a tropical twist. It adds a great crunch and flavor.
- Crushed Nuts: Roll them in crushed nuts for texture. Almonds or walnuts add a nice bite. Nuts also boost the nutrition in these treats.
Feel free to mix and match these ideas. Each variation makes the truffles unique!
Storage Info
How to Store Truffle Bites
To keep your truffle bites fresh, store them in a cool place. The best temperature is around 60°F to 70°F. This helps maintain their rich flavor and smooth texture.
Use airtight containers to prevent them from drying out. Glass jars or plastic containers with tight lids work well. If you have a lot of truffles, layer them between pieces of parchment paper. This keeps them from sticking together.
Shelf Life
These truffles can last about one week in the fridge. After that, they may start to lose their taste. To check if they are still good, look for any changes in color or smell.
If you notice any signs of spoilage, it’s best to toss them. Always trust your senses when it comes to food freshness.
Freezing Truffles
If you want to keep your truffles longer, freezing is a great option. Here’s how to do it:
1. Prepare the Truffles: First, make sure the truffles are set completely in the fridge. This helps them hold their shape when frozen.
2. Arrange on a Baking Sheet: Place the truffles in a single layer on a baking sheet. Make sure they don’t touch each other. This prevents them from sticking.
3. Freeze: Put the baking sheet in the freezer for about two hours. This allows the truffles to freeze solid.
4. Transfer to Containers: Once frozen, move the truffles to an airtight container or freezer bag. Label the container with the date.
5. Seal and Store: Make sure to seal it tight to avoid freezer burn.
To thaw, just leave the truffles in the fridge for a few hours or overnight. This keeps the texture nice and creamy. Avoid thawing them at room temperature, as it can make them too soft. Enjoy your truffles even longer with this simple freezing method!
FAQs
What is the best way to melt sugar-free chocolate?
The best way to melt sugar-free chocolate is in a microwave. Use a microwave-safe bowl. Heat the chocolate chips in 20-second bursts. Stir after each burst to ensure even melting. You can also use a double boiler. Place chocolate in a bowl over simmering water. Stir until smooth and melted.
Can I use frozen raspberries for this recipe?
Yes, you can use frozen raspberries. Thaw them first and drain excess liquid. This helps keep the mixture thick. Fresh raspberries add a bright flavor, but frozen works well too.
How long do these truffles stay fresh?
These truffles stay fresh for about one week in the fridge. Store them in an airtight container. They can lose texture over time, so enjoy them soon!
Are there any low-carb options for this recipe?
Yes, there are low-carb options. Use low-carb sweeteners like erythritol or stevia. Make sure the chocolate chips are sugar-free and low in carbs. Coconut cream is already low in carbs, making it a great choice.
Can I make these truffles ahead of time?
Yes, you can make these truffles ahead of time. Prepare and shape them, then store in the fridge. They are perfect for parties or special treats. You can also freeze them for longer storage.
You learned how to make delightful truffles using simple ingredients like dark chocolate, coconut cream, and fresh raspberries. Follow the step-by-step guide for the best results. Remember to chill the mixture properly and avoid common mistakes like overheating chocolate. You can even try variations, adding flavors or adjusting the recipe to be vegan. These treats are easy to customize, making them perfect for any occasion. Enjoy your truffles and impress your friends!