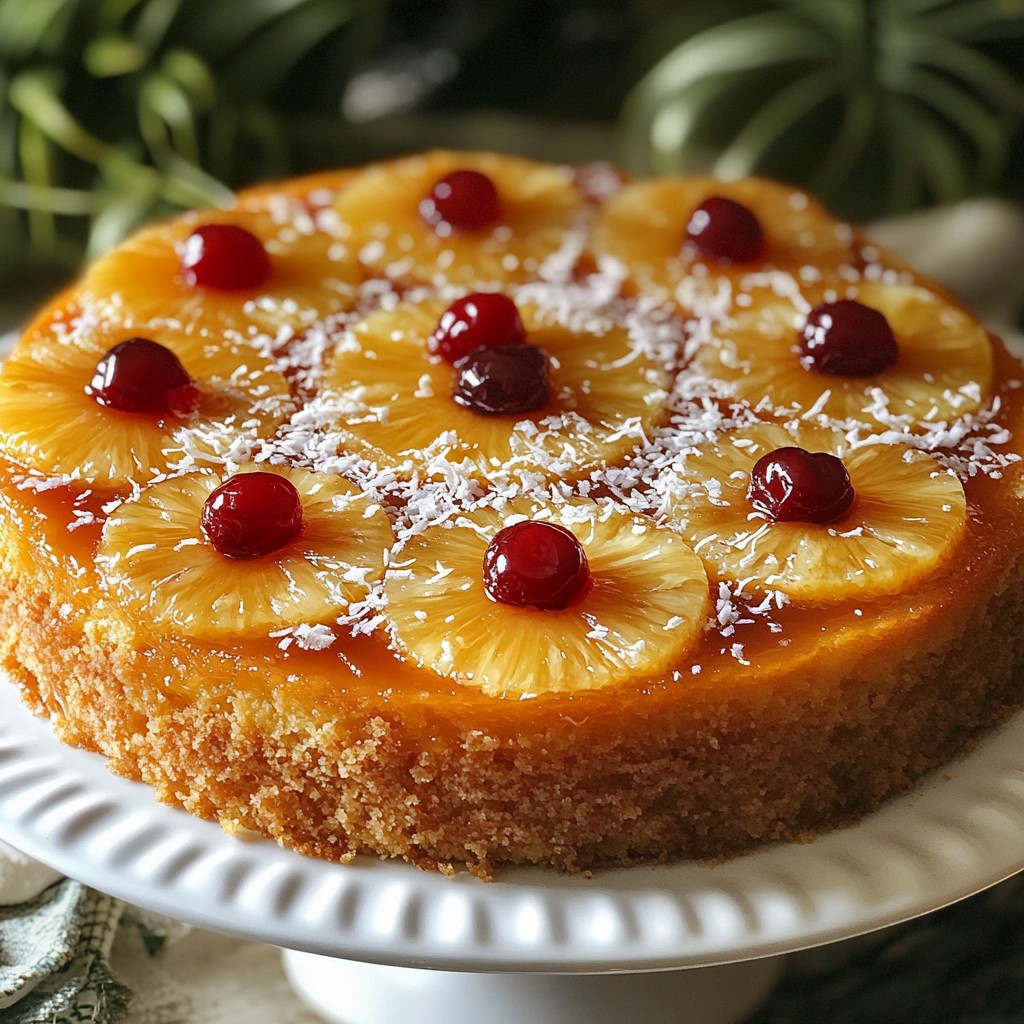
Welcome to my delightful journey of baking Coconut Pineapple Upside Down Cake! This beloved dessert combines sweet pineapple with rich coconut, creating a tropical treat that will impress your friends and family. In this post, I’ll share easy steps, essential ingredients, and clever tips to help you make your own show-stopping cake. Get ready to dive into this flavor-packed recipe that brings sunshine to your kitchen!
Why I Love This Recipe
- Delicious Flavor Combination: The sweet and tangy pineapple pairs perfectly with the rich coconut, creating a tropical delight in every bite.
- Easy to Make: This recipe is straightforward and requires minimal ingredients, making it perfect for bakers of all skill levels.
- Impressive Presentation: The upside-down design with pineapple rings and cherries makes for a stunning centerpiece at any gathering.
- Perfect for Any Occasion: Whether it's a birthday, holiday, or just a weekend treat, this cake is versatile enough for all celebrations.
Ingredients
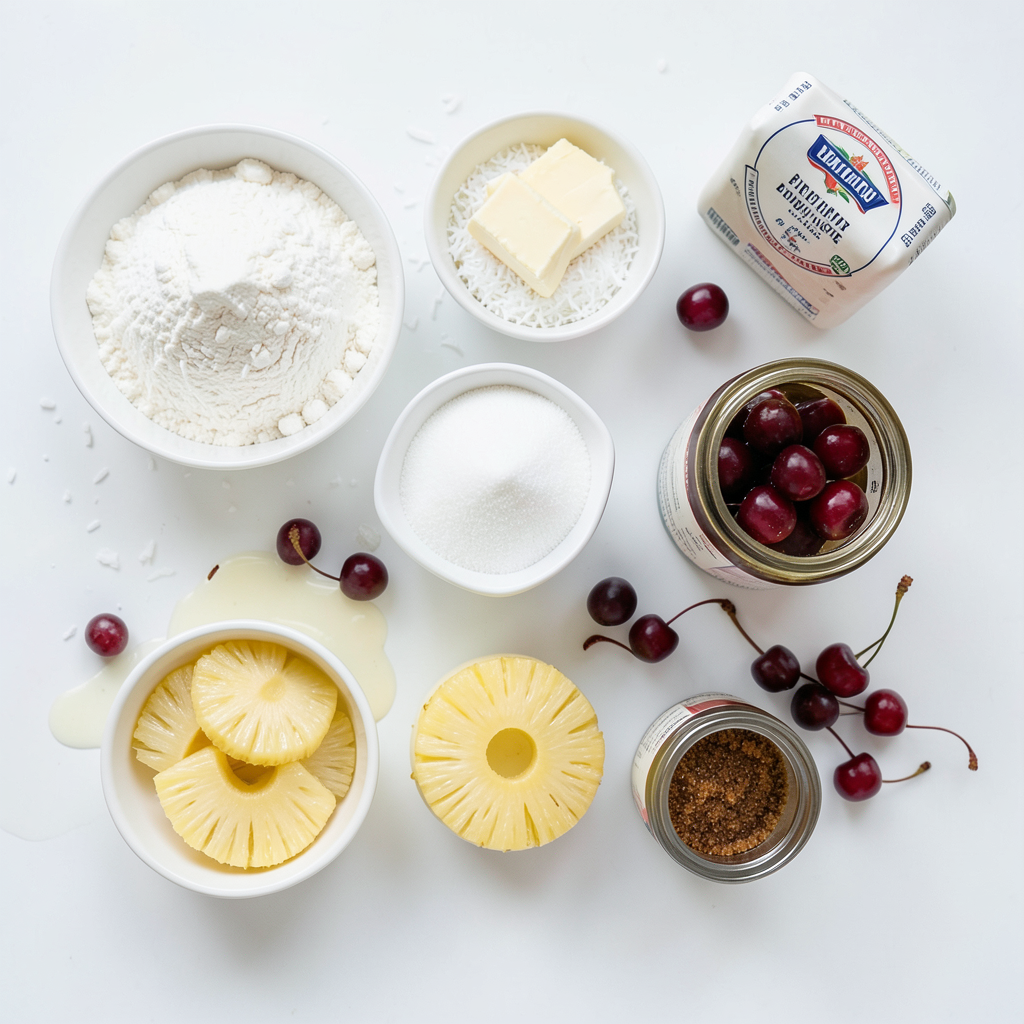
Essential Ingredients for Coconut Pineapple Upside Down Cake
To make this cake, you need:
- 1 cup all-purpose flour
- 1 cup granulated sugar
- 1/2 cup unsweetened shredded coconut
- 1/2 cup unsalted butter, melted
- 2 large eggs
- 1 teaspoon vanilla extract
- 1/2 teaspoon baking powder
- 1/2 teaspoon baking soda
- 1/4 teaspoon salt
- 1/2 cup buttermilk
- 1 can (8 oz) pineapple rings, drained
- 1/2 cup brown sugar
- 1/4 cup maraschino cherries (optional)
These ingredients create a soft, moist cake with sweet pineapple and coconut flavors.
Optional Ingredients for Variation
You can add some fun twists to your cake:
- Chopped nuts like walnuts or pecans for crunch
- Ground cinnamon or nutmeg for warmth
- Fresh fruit pieces like cherries or mangoes for more flavor
These additions can enhance the taste and texture of your cake.
Ingredient Substitutions
If you need to swap some ingredients, here are some ideas:
- Use coconut milk instead of buttermilk for a richer taste
- Swap granulated sugar with brown sugar for a deeper flavor
- Use a dairy-free butter option if you prefer vegan choices
These substitutions can help you make the cake fit your needs while keeping it delicious.
Step-by-Step Instructions
Prepping Your Cake Pan and Oven
Start by preheating your oven to 350°F (175°C). Grab a 9-inch round cake pan. Grease the pan well with butter. This helps the cake come out easily. Next, line the bottom with parchment paper. This step is key for easy removal later.
Mixing Dry and Wet Ingredients Separately
In a small bowl, melt the unsalted butter in the microwave. Pour this melted butter into your prepared cake pan. Spread it evenly across the bottom. Now, sprinkle brown sugar over the butter. This mix will create a sweet layer. In a larger bowl, combine the flour, sugar, shredded coconut, baking powder, baking soda, and salt. Mix these dry ingredients well. Use a whisk or fork to break any lumps.
In another bowl, crack the two eggs and whisk them. Add the vanilla extract and buttermilk. Mix until everything is smooth. Gradually pour in the melted butter while whisking. This ensures a nice blend of flavors.
Arranging Pineapple and Assembling the Cake Batter
Now, it's time to arrange the pineapple. Take your drained pineapple rings and place them over the brown sugar. Fit them snugly. If you like, add maraschino cherries in the center of each ring. This adds fun color and taste.
Next, pour the wet ingredients into the bowl with the dry mix. Gently stir with a spatula until just combined. Be careful not to overmix; a few lumps are okay.
Now, gently spoon the batter over the arranged pineapple. Spread it evenly without disturbing the fruit. Bake the cake for 35-40 minutes. To check if it's done, insert a toothpick into the center. If it comes out clean, your cake is ready.
After baking, let the cake cool in the pan for about 10 minutes. Then, carefully invert it onto a serving plate. Peel away the parchment paper to show off that beautiful pineapple topping. Allow the cake to cool for a few more minutes before slicing and serving. Enjoy!
Tips & Tricks
Baking Tips for Perfect Texture and Flavor
To get the best texture and flavor, follow these tips:
- Use fresh ingredients. Fresh eggs and butter make a big difference.
- Measure flour correctly. Spoon it into the cup and level off.
- Mix dry and wet ingredients separately. This helps avoid lumps in the batter.
- Don’t overmix the batter. Stir just until combined for a light cake.
Cooling and Inversion Tips for Presentation
A beautiful cake starts with how you cool and invert it. Here’s what to do:
- Cool the cake for 10 minutes in the pan. This helps it firm up.
- Run a knife around the edges to loosen it before inverting.
- Place a plate over the pan and flip quickly. This keeps the fruit intact.
- Peel off the parchment paper gently to reveal the lovely topping.
Common Mistakes to Avoid when Making Upside Down Cake
Avoid these common mistakes to ensure success:
- Skipping the parchment paper can make removal hard. Always use it!
- Forgetting to drain the pineapple leads to a soggy cake. Make sure to drain!
- Overbaking can dry out the cake. Keep an eye on the time!
- Using cold ingredients can affect the cake’s rise. Bring eggs and buttermilk to room temp.
Pro Tips
- Use Fresh Ingredients: For the best flavor, use fresh pineapple instead of canned. It adds a vibrant taste and enhances the overall quality of the cake.
- Don’t Overmix the Batter: When combining wet and dry ingredients, mix just until combined. Overmixing can lead to a dense cake, so a few lumps are perfectly fine!
- Let It Cool Before Inverting: Allow the cake to cool in the pan for at least 10 minutes before inverting. This helps prevent the topping from sticking and breaking apart.
- Serve with Toppings: Elevate your cake by serving it warm with a scoop of vanilla ice cream or a dollop of whipped cream. A sprinkle of shredded coconut adds a nice touch!
Variations
Tropical Add-Ins
You can add more fun to your cake with tropical fruits. Consider using mango or banana. These fruits pair well with coconut and pineapple. Just chop them into small pieces and add them to the batter. You can even layer them on top of the pineapple rings for extra flavor.
Flavor Infusions
Want to change the taste? Try adding coconut or almond extract. A teaspoon of coconut extract adds a deeper coconut flavor. Almond extract gives a lovely nutty hint. Just mix it into your wet ingredients for a new twist.
Dietary Variations
You can make this cake gluten-free easily. Use a gluten-free flour mix instead of all-purpose flour. For a vegan option, swap the eggs with flax eggs and use plant-based milk. This way, everyone can enjoy this delicious cake!
Storage Info
How to Store Coconut Pineapple Upside Down Cake
To keep your Coconut Pineapple Upside Down Cake fresh, store it in an airtight container. Place it at room temperature for up to two days. If you want to keep it longer, refrigerate the cake. Cover it with plastic wrap or foil to avoid drying out. The chill will help maintain its moist texture.
Freezing Instructions for Long-Term Storage
You can freeze this cake for longer storage. First, let it cool completely. Wrap the cake tightly in plastic wrap. Then, place it in a freezer bag or container. This will help prevent freezer burn. The cake can last up to three months in the freezer. When ready to eat, thaw it in the fridge overnight before serving.
Best Ways to Reheat Leftover Cake
For the best taste, reheat the cake gently. Place a slice on a microwave-safe plate. Heat it for about 10-15 seconds. This warms the cake without drying it out. You can also reheat it in the oven. Set the oven to 350°F (175°C). Heat for about 5-10 minutes. Enjoy warm with ice cream or whipped cream for an extra treat!
FAQs
What can I serve with Coconut Pineapple Upside Down Cake?
You can serve this cake with many tasty options. I love pairing it with a scoop of vanilla ice cream. The cold ice cream melts into the warm cake and adds creaminess. You can also try whipped cream for a light touch. Fresh fruit, like sliced strawberries or berries, adds color and freshness. For a unique twist, add a sprinkle of toasted coconut on top!
How long does the cake last in the refrigerator?
This cake stays fresh for about 3 to 5 days in the fridge. Make sure to cover it well. A cake dome or plastic wrap works great. The flavors may deepen as it sits. Just remember to let it warm up a bit before enjoying. It tastes best when it is not too cold.
Can I use fresh pineapple instead of canned for this recipe?
Yes, you can use fresh pineapple! Just cut it into rings and remove the core. Fresh pineapple will give a brighter flavor. Make sure to pat the slices dry so the cake does not get soggy. Using fresh fruit can make your cake feel even more special.
You now have a solid plan for making Coconut Pineapple Upside Down Cake. We covered essential and optional ingredients, plus substitutions. Following the step-by-step instructions ensures a great bake each time. Remember the tips for perfect texture and avoiding common mistakes. You can also explore tropical add-ins and dietary variations for unique flavors. Lastly, proper storage and reheating keep your cake fresh and delicious. Enjoy every slice of this tropical delight!